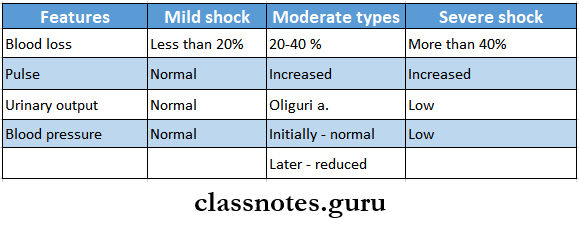
Question 1. Types of shock.
Answer:
Various Types Of Shock Are As Follows:
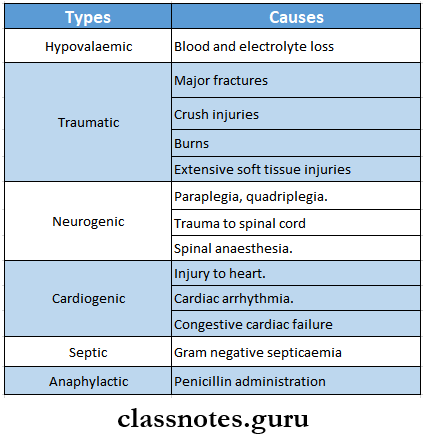
Question 2. Septic shock.
Answer:
Aetiology:
- Release of endotoxin by gram-negative organisms.
- Severe septicaemia.
- Peritonitis.
- Meningitis
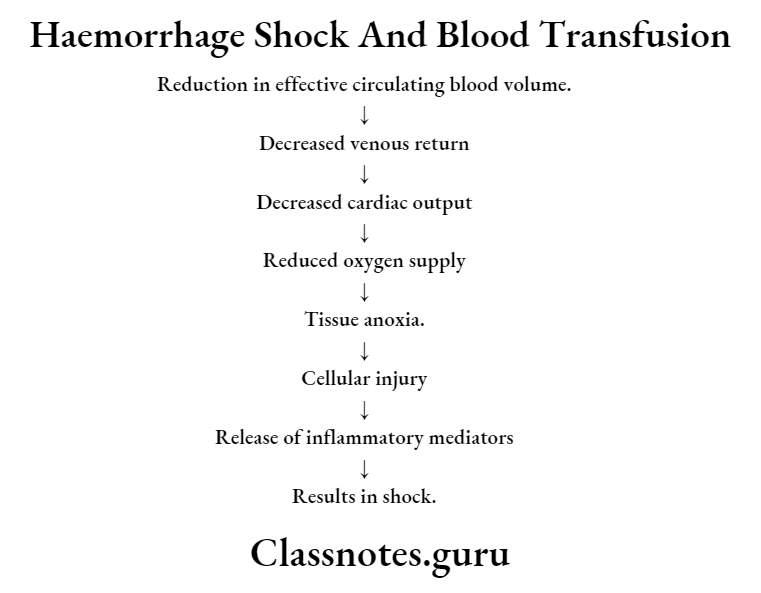
Haemorrhage shock and blood transfusion Q&A
Question 3. Neurogenic shock.
Answer:
Neurogenic Shock Causes:
- Paraplegia, quadriplegia.
- Trauma to the spinal cord.
- Spinal anaesthesia.
Neurogenic Shock Clinical Features:
- Skin remains warm, pink and well-perfused.
- Urinary output – normal.
- Heart rate is rapid.
- Blood pressure is decreased.
Question 4. Cardiogenic shock.
Answer:
Cardiogenic Shock Causes:
- Injury to the heart
- Myocardial infarction.
- Cardiac arrhythmia.
- Congestive cardiac failure.
Cardiogenic Shock Clinical Features:
- Initially
- Skin is pale and cool.
- Urine output reduced.
- Later
- Rapid pulse.
- Hypotension
- Distended neck veins.
- The liver is enlarged.
- The heart becomes enlarged.
Read And Learn More: General Surgery Question and Answers
Question 5. Hypovolaemic shock.
Answer:
Hypovolaemic Shock Causes:
- Blood and plasma loss
- Electrolyte loss.
Question 6. Crush Syndrome.
Answer:
Crush Syndrome
It is a symptom complex in which a portion of the body becomes crushed due to a heavy weight falling on that portion and is kept there for some time to crush all the tissues in that portion.
Crush Syndrome Causes:
- Earthquakes
- Mine injuries
- Air raids
- Collapse of the building.
- Use of a tourniquet for a longer period.
Crush Syndrome Clinical Features:
- Extravasation of blood into muscles.
- Muscles are crushed and swollen.
- Acute renal tubular necrosis.
- Reduced urinary output.
- Tense and painful extremities.
Crush Syndrome Treatment:
- Application of a tourniquet.
- Parallel incisions are made to relieve tension.
- Administration of intravenous fluid.
- Catheterisation of the bladder.
- Hemodialysis is a severe condition.
Short questions on haemorrhage and shock
Question 7. Hypokalaemia.
Answer:
Hypokalaemia
Potassium deficiency in the diet is called hypokalemia.
Hypokalaemia Causes:
- Following trauma.
- Starvation
- Loss of gastrointestinal secretion.
Hypokalaemia Clinical features:
- Gradual onset of drowsiness.
- Slow and slurred speech.
- Irritability.
- Muscular hypotonia and weakness.
- Absence of deep reflexes.
- Slow pulse rate.
- Diminished intestinal motility.
- Low BP.
- Skin remains warm and dry.
Hypokalaemia Treatment:
- Replacement of potassium deficit.
Question 8. Acidosis.
Answer:
Acidosis
An increase in pH leads to acidosis.
Acidosis Types:
- Metabolic acidosis.
- In it, there is a gain or retention of fixed acids or a loss of base.
- Cause:
- Diabetic acidosis.
- Lactic acidosis.
- Renal insufficiency.
- Rapid transfusion of bank blood.
- Diarrhoea.
- Clinical Features:
- Increase in rate and depth of breathing.
- Rapid and noisy respiration.
- Raised pulse rate and blood pressure.
- Urine becomes strongly acidic.
- Treatment:
- Administration of Ringer’s lactate solution.
- Respiratory acidosis.
- Causes:
- Lung disorders.
- Peritonitis
- Crush injury.
- Depressed respiratory centre.
- Airway obstruction.
- Causes:
Acidosis Clinical Features:
- Slow rise in BP.
- Abnormal respiration.
- Restlessness.
- Hypertension
- Tachycardia.
Acidosis Treatment:
- Mechanical ventilation
- Endotracheal intubation.
- Avoid over-sedation and over-use of muscle relaxants.
Question 9. Haemorrhage.
Answer:
Haemorrhage
Haemorrhage is defined as the escape of blood from blood vessels.
Haemorrhage Classification:
- Based on the bleeding haemorrhage.
- External and internal.
- Arterial, venous or capillary.
- Based on the time of appearance.
- Primary – Secondary – Reactionary.
Blood transfusion questions and answers
Question 10. Secondary Haemorrhage.
Answer:
Secondary Haemorrhage
Secondary Haemorrhage is a bleeding that usually occurs after 7-14 days of injury.
Secondary Haemorrhage Causes:
- Infection.
- Sloughing part of the arterial wall.
Secondary Haemorrhage Clinical features:
- Preceded by a warning, haemorrhage staining the dressings.
- Followed by moderate to severe haemorrhages.
Secondary Haemorrhage Types:
- Externally – example: at the operation site of haemorrhoids- tomy.
- Internally, Example: haematemesis following peptic ulcer operation.
Question 11. Hemophilia.
Answer:
Hemophilia
Haemophilia is an X-linked recessive disorder of coagulation factors.
Haemophilia Types:
- Haemophilia A-classic haemophilia – due to factor 8 deficiency.
- Haemophilia Christmas disease -due to factor 9 deficiency.
- Von Willebrand’s disease is due to a deficiency of von Willebrand factor.
Haemophilia Clinical features:
- Easy bruising
- Prolonged bleeding.
- Spontaneous bleeding into subcutaneous tissue.
- GIT bleeding.
- Hypotaxis.
- Recurrent haemarthrosis.
- Hematuria.
- Intracranial haemorrhage.
Question 12. Disseminated intravascular coagulation (DIC)
Answer:
Disseminated intravascular coagulation (DIC)
Disseminated intravascular coagulation is a complex thrombo-hemorrhagic disorder occurring as a secondary complication in some systemic diseases.
Pathogenesis:
- Includes
- Activation of coagulation
- Thrombotic phase
- Consumption phase.
- Secondary fibrinolysis.
Question 13. Blood groups.
Answer:
Blood groups
Blood groups are classified based on the presence or absence of specific agglutinogen or antigen on the surface of RBC.
Major blood groups are:
1. ABO system
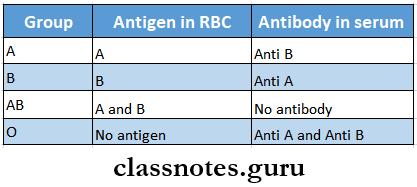
2. Rh blood group.
- Rh factor is an antigen present in RBC.
- Persons having the D antigen are called Rh-positive.
Question 14. Rh factor.
Answer:
Rh Factor
- Rh factor is an antigen present in RBCs.
- Rh factor was first discovered by Landsteiner and Weiner in rhesus monkey.
- Rh factor is detected only in RBCs
- Rh factor is inherited from both parents as homozygous positive DD, heterozygous negative Dd or homozygous negative dd.
- Rh Antibody is absent in plasma.
- But its production can be evoked by.
- Transfusion with Rh-positive blood.
- The entrance of Rh-positive blood from the foetus into the circulation of the Rh-negative mother.
Types of shock short answer questions
Question 15. Blood Transfusion.
Answer:
Blood Transfusion
Blood Transfusion is a process of transferring blood or blood-based products from one person into the circulatory system of another.
Blood Transfusion Types:
- Typical stored CPD blood from the blood bank.
- Filtered blood filtered through a membrane with 40 |im pores.
- Warm blood is used in cardiopulmonary operations.
- Autotransfusion – preserving and then transfusing one’s blood.
- Replacement transfusion – used in newborns.
Question 16. Indications of blood transfusion.
Answer:
Acute Haemorrhage.
- During operations, preoperatively and postoperatively.
- Anaemia.
- Malnutrition.
- In severe burns.
- In coagulation disorders.
- In erythroblastosis fetalis.
- During chemotherapy.
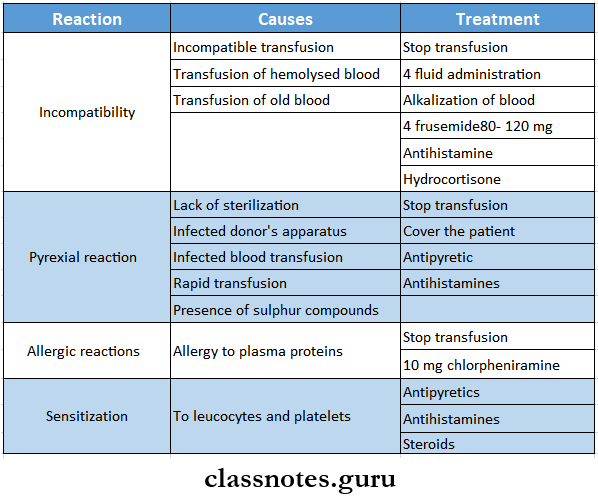
Question 17. Complications of blood transfusion.
Answer:
Complications Of Blood Transfusion
- Transfusion reactions
- Incompatibility
- Pyrexia reactions
- Allergic reactions
- Sensitisation to leucocytes and platelets
- Transmission of diseases
- Serum hepatitis
- AIDS
- Reactions caused by massive transfusion.
- Acid-base imbalance.
- Hyperkalaemia.
- Citrate toxicity.
- Hypothermia.
- Failure of coagulation.
- Complications of over-transfusion.
- Congestive cardiac failure.
- Other complications.
- Thrombophlebitis
- Air embolism.
Question 18. Types of haemorrhage
Answer:
Types of Haemorrhage
- According to the source
- External haemorrhage – seen externally
- Internal haemorrhage – not seen externally
- According to the vessels involved
- Arterial haemorrhage – haemorrhage coming out of the artery
- Venous haemorrhage – haemorrhage coming out of a vein
- Capillary haemorrhage – haemorrhage coming out of the capillary
- According to the time of appearance
- Primary haemorrhage – at the time of injury
- Reactionary haemorrhage – within 24 hours of injury
- Secondary haemorrhage – after 7-14 days of injury
MCQs on haemorrhage and shock
Question 19. Reactions to blood transfusion
Answer:
Reactions To Blood Transfusion