Principles Of Periodontal Instrumentation
Principles Of Periodontal Instrumentation Long Essays
Question 1. Describe the principles of oral prophylaxis.
Answer:
Oral Prophylaxis Definitions:
1. Scaling:
- It is a process by which plaque and calculus are removed from both supragingival and subgingival tooth surface
2. Root planning:
- It is the process by which residual embedded calculus and the portion of cementum are removed from the roots to produce a smooth, hard, and clean surface
Read And Learn More: Periodontics Question and Answers
Oral Prophylaxis Principles:
- To restore gingival health by completely removing elements that provoke gingival inflammation
- Removal of extensive amounts of dentin and cementum is not necessary to render roots free of toxins and
- The number of appointments should be estimated based on
- Number of teeth present
- Severity of inflammation
- Amount and location of calculus
- Pocket depth
- Presence of furcation
- Patient’s comprehension
- Need of local anesthesia
- Good visual and tactile detection is required
- Visual examination is carried out by good lighting and a clean field
- The explorer/probe is held with lightly modified pen grasp pads of thumb and fingers and perceives slight vibrations conducted through the instrument shank and handle as tooth surface irregularities are encountered
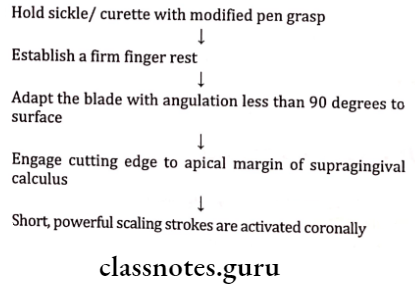
Oral Prophylaxis Supragingival Scaling: Sickles, curettes, and ultrasonic and sonic instruments are used
Oral Prophylaxis Technique:
Oral Prophylaxis Subgingival Scaling
- Done by universal/Gracey curettes
Oral Prophylaxis Technique:
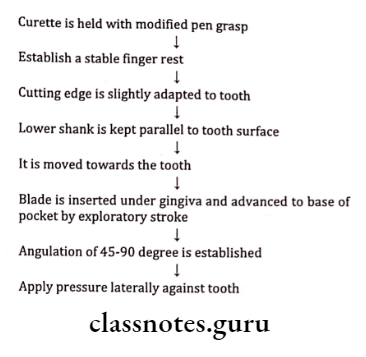
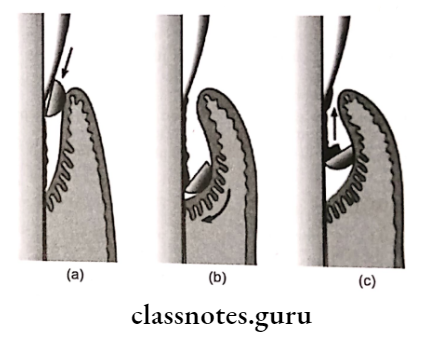
- Curette is inserted with the face of the blade flush against the tooth.
- Working angulation (45-90 degrees) is established at the base of the pocket.
- Lateral pressure is applied and the scaling stroke is activated in the coronal direction.
Principles Of Periodontal Instrumentation Short Essays
Question 1. Principles of Instrumentation.
Answer:
1. Accessibility: Thorough accessibility should be provided
Operator’s Position:
- Chair position – 9-12’0 clock
- Forearm parallel to the floor
- Thighs parallel to the floor
- Feet rest on the floor
- Back straight
Patient’s Position:
- Supine position
- Maxillary – Back of chair parallel to the floor
- Mandibular – It is slightly raised
- The patient’s mouth close to the elbow of the clinician
- Chin – Maxillary – position upward
- Mandibular – positioned downward
2. Visibility, Illumination, and Retraction:
- Direct vision and direct illumination through dental light
- Indirect vision and indirect illumination through mouth mirror
Visibility, Illumination, and Retraction Method:
- Operator’s position 12’0 clock
- Placement of mirror behind the central incisor
- Position unit light such that the light beam is incident on the mirror and reflected
Visibility, Illumination, and Retraction Retraction – Through:
- Mouth mirror
- Fingers of the non-operating hand
3. Condition of Instruments:
- Instruments must be sharp enough to provide efficient use
- Reduced treatment time
- Comfortable with patient and clinician
- Dull instruments lead to
- Incomplete plaque removal
- Need of excessive force
- Trauma to soft tissues
4. Maintaining a clean field:
- The operating field must be free of saliva, blood, and debris
- To obtain it, various measures can be undertaken
- Use of suction
- Flushing with water
- Use of compressed air
- Packing the reflected tissue with a gauze square
5. Instruments stabilization:
- Use effective instrumentation
- Avoid injuries to patient and clinician
Instruments Stabilization Factors:
- Instrument Grasp:
- Commonly used – modified pen grasp Advantages:
- Precise control
- Permits all movements
- Facilitates good tactile sensation
- Finger rest:
- Stabilizes hand and instrument
- Provide firm fulcrum
- Prevents soft tissue injury
Commonly used Finger Types: Ring finger
Intraoral:
- Standard
- Modified
- Piggybacked
- Cross arch
- Opposite arch
- Finger on finger
Extraoral:
- Knuckle-rest technique palm up
- Chin-cup technique palm down
6. Instrument Activation:
1. Adaptation: It is the manner in which the working end of a periodontal instrument is placed against the surface of a tooth.
The leading third of cutting edge is more often used.
Adaptation Use:
- Prevent soft tissue trauma
- Ensures maximum effectiveness
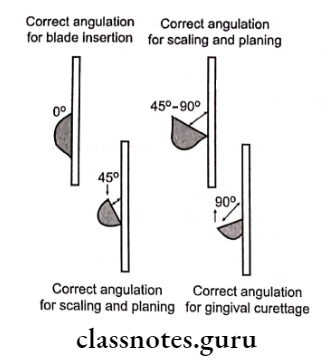
2. Angulation: It refers to the angle between the face of a bladed instrument and the tooth surface
- Subgingival scaling-0-400
- Supragingival scaling-45-900
- Gingival curettage – >90°
3. Lateral pressure: Refers to the pressure created when force is applied against the surface of a tooth with the cutting edge of a bladed instrument
4. Strokes – Types: Placement stroke, exploratory stroke, scaling stroke, root planning stroke
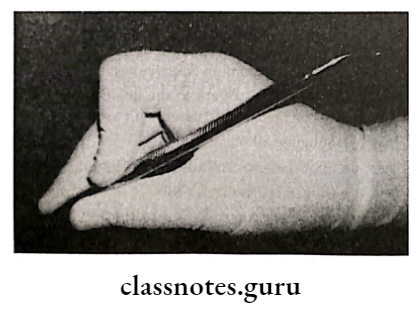
Question 2. Modified Pen Grasp.
Answer:
Commonly used grasp
Modified Pen Grasp Position:
Middle finger:
- Rests over shank
- Guides working end
- Feels vibration
Index finger:
- Bend from middle phalanges
- Placed over the middle finger
Thumb:
- Placed over the opposite side
- All together creates a tripod effect
Question 3. Rest/Finger Rest.
Answer:
Intra-oral:
1. Standard Intraoral finger rest:
- The finger rests on a stable tooth surface immediately adjacent to the working area
- Not used in the edentulous area
2. Advanced:
- Modified intraoral fulcrum
- Combination of modified pen grasp with the standard intraoral fulcrum
- Used for maxillary teeth
- Piggybacked fulcrum
- The middle finger rests on top of the ring finger
- Not used with limited mouth opening
- Cross arch fulcrum
- Resting the ring finger on a tooth on the opposite side of the arch
- Opposite arch fulcrum
- Resting ring finger on the opposite arch
- Finger on finger fulcrum
- Resting ring finger on index finger
Extra Oral fulcrums:
1. Palm up:
- Used for procedures carried out with clinician’s palm resting against patient’s chin
2. Palm down:
- Here the clinician holds the patient’s chin with the palms of his hands.
- Principles Of Periodontal Instrumentation Short Question and Answers
Question 1. Instrument stabilization.
Answer:
- Instrument stabilization avoids injuries to patients and clinicians
- Instrument stabilization is carried out by
1. Instrument Grasp:
- A commonly used grasp is a modified pen grasp
Instrument Grasp Advantages:
- Precise control
- Permits all movements
- Facilitates good tactile sensation
2. Finger Rest:
Finger rest Uses:
- Stabilizes hand and instrument
- Provides firm fulcrum
- Prevents soft tissue injury
Finger Rest Types:
- Intra-oral rest:
- Standard intraoral finger rest
- Modified
- Piggybacked
- Cross arch
- Opposite arch
- Finger on finger
- Extraoral rest:
- Knuckle rest technique- palm up
- Chin-cup technique- palm down
Question 2. Instrument angulation
Answer:
- Instrument Angulation refers to the angle between the face of a bladed instrument and the tooth surface
- Subgingival scaling-0-40 degree
- Supragingival scaling-45-90 degrees
- Gingival curettage- .90 degrees
Question 3. Strokes.
Answer:
Strokes Types:
1. Exploratory:
- Use to evaluate pocket depth
- Detects calculus
- Detects irregularities over tooth structure with the help of curettes
2. Scaling strokes:
- These are short, powerful, pull strokes
3. Root planning strokes:
- These are moderate, light pull strokes
- Hoe, files, and ultrasonic instruments used in it
Principles Of Periodontal Instrumentation Viva Voce
- Instrument grasp and finger rest provide stability to the instrument during instrumentation
- Modified pen grasp is the most effective and stable grasp
- In a standard pen grasp, shank of the instrument rests on the side of the middle finger
- The fourth finger is mostly preferred as a finger rest
- In the conventional technique, finger rest is established on teeth surfaces immediately adjacent to the working area
- Palm up and palm down is commonly used extra oral fulcrums
- Adaptation is placing the instrument against the tooth sur- face
- Tooth blade angulation during gingival curettage should be >90°
- A scaling stroke should be initiated in the forearm
- Curettes are a most effective and versatile instrument for root planning