
Intraoral Radiographic Techniques Important Notes
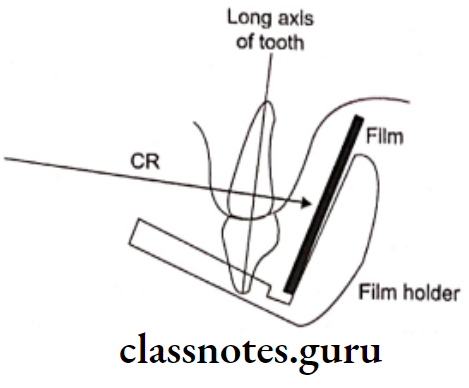
- Paralleling Technique:
- Also called as right angle or long cone technique
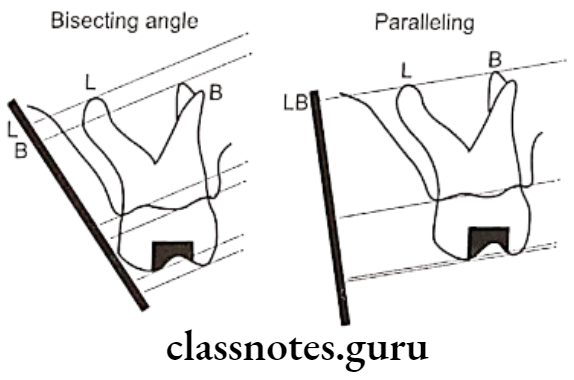
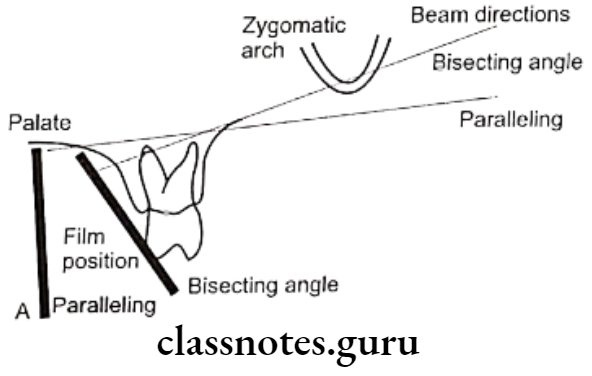
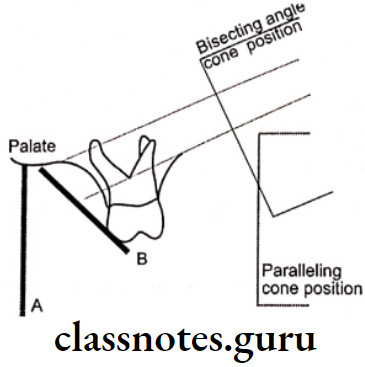
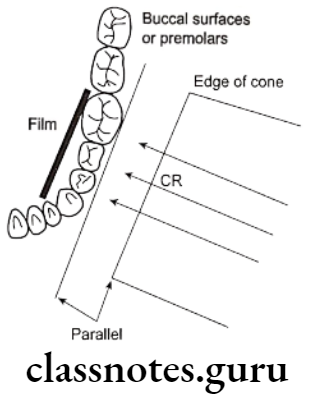
- The film is placed parallel to the long axis of the teeth (object).
- The central ray is perpendicular to both the object and the film.
- This technique minimizes distortion, as it obeys the imaging principles.
- The paralleling technique is the preferred method of taking IOPA
Disadvantages- To position the film parallel to the teeth, the film should be placed away from the teeth making it difficult to hold without the use of film holders.
- The increased object film distance can result in some image magnification and loss of definition by increasing the penumbra.
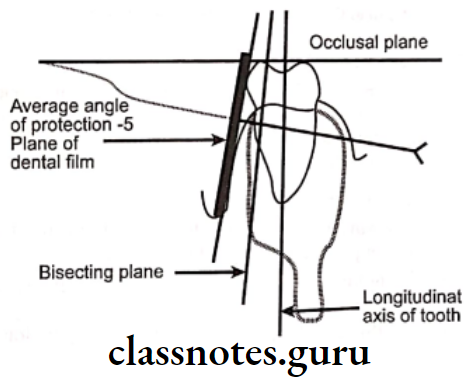
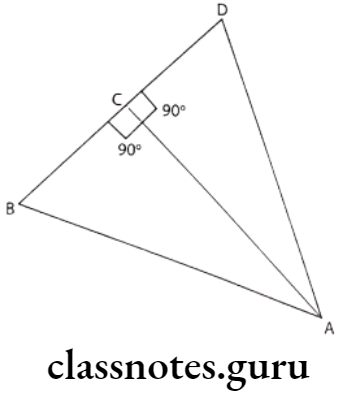
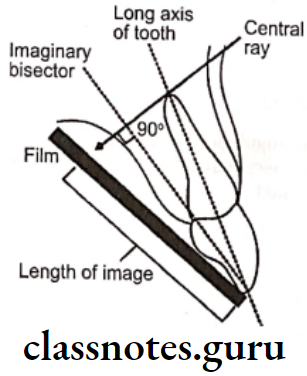
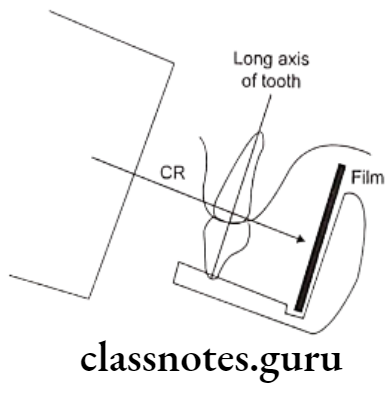
- Bisecting Angle Technique:
- It is based on CIEZYNSKI’s rule of isometry
- The film is placed closer to the teeth and is not parallel to the long axis of the teeth.
- The central ray is perpendicular to the imaginary plane that bisects the angle formed by the film with the axis of the object
- This arrangement inherently causes some distortion.
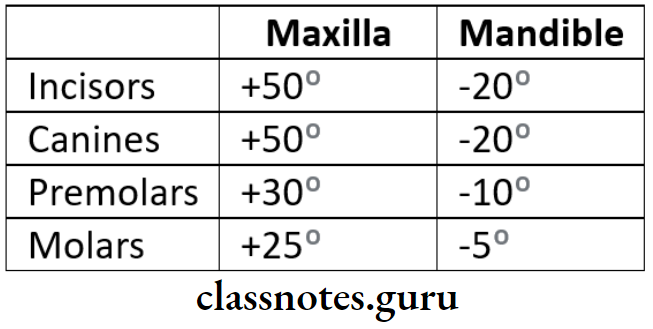
- Angulations for bisecting angle technique:
Read And Learn More: Oral Radiology Question and Answers
- Vertical angulations for child patients:
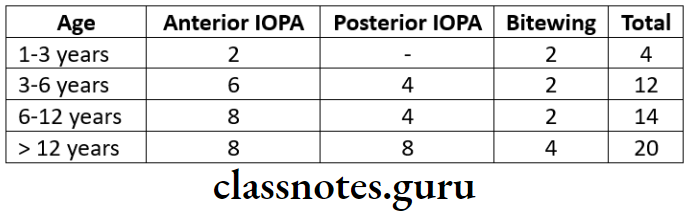
- The number of radiographs required according to age is
Intraoral Radiographic Techniques Long Essays
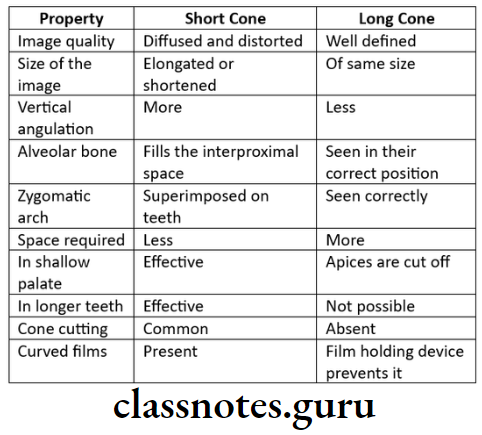
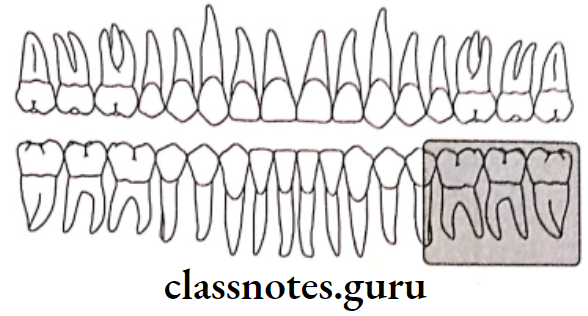
Question 1. Compare short-cone and long-cone techniques. Describe the technique of radiography of the lower third molar.
Answer.
Comparison of short-cone and long-cone techniques
Read And Learn More: Oral Radiology Question and Answers
Bisecting Angle Technique:
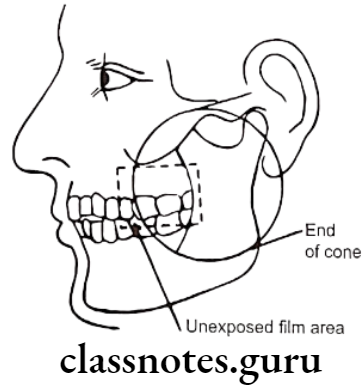
- The main difficulty is the placement of the film packet sufficiently posteriorly to record the entire third Mandibular molar and surrounding tissues, including the inferior dental canal
- The possible solutions are
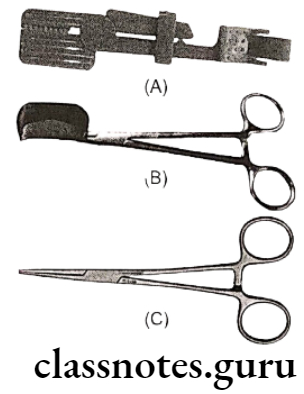
- Using a surgical needle holder to hold and position the film packet in the mouth as follows
- The film holder is clipped securely on the top edge of the film packet
- With the mouth open, the film packet is positioned gently in the lingual sulcus as far posteriorly as possible
- The patient is asked to close the mouth on the handles and at the same time the film packet is eased further back into the mouth
- The patient is asked to support the handles of the needle holder in position
- The X-ray tube is positioned at right angles to the third molar and the film packet
- It is centered 1 cm above the lower border of the mandible on a vertical line dropped from the outer canthus of the eye
- Taking two radiographs of the third molar using two different horizontal tube head angulations
- The film packet is positioned as posteriorly as possible
- The X-ray tube is aimed at ideal horizontal angulations
- A second film packet is placed in the same position, but the X-ray tube is positioned further posteriorly to project the apex of the third molar onto the film
- The vertical angulations are the same for both projections
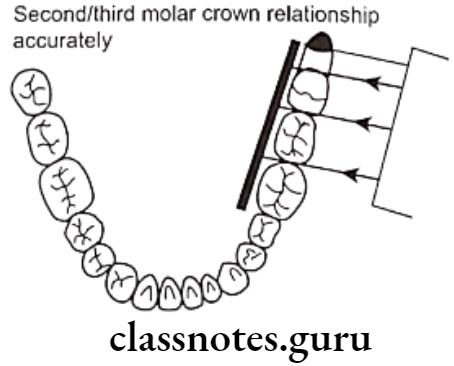
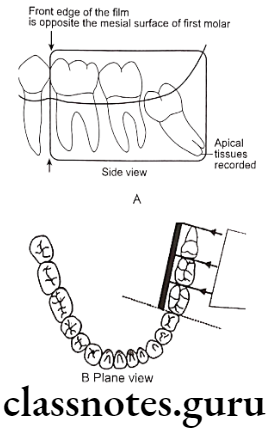
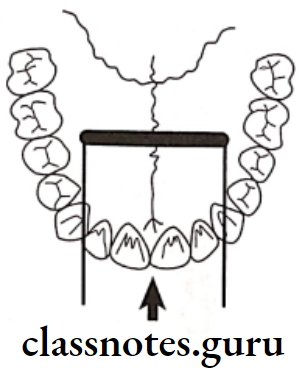
Image Field:
- The projection should show the three molars
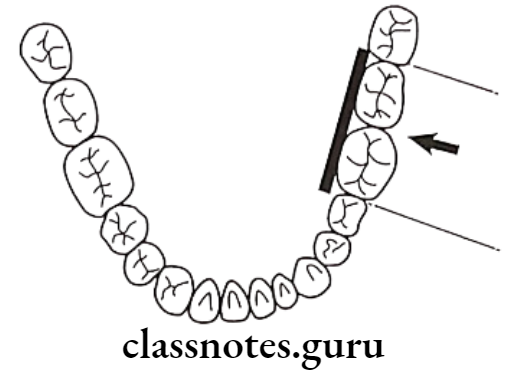
Film Placement:
- The film should be placed with the inferior border positioned beneath the lateral border of the tongue and against the lingual surface of the mandible
- The superior border should be just above the cusps of the Mandibular molars
- The anterior border should cover the mesial half of the first molar
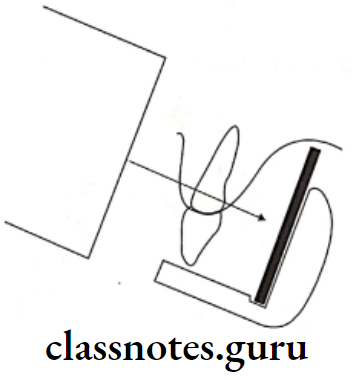
Projection Of Central Ray:
- It Should pass through the interproximal space between the molar teeth
- The point of entry is on the cheek below, a little posterior to the lateral canthus of the eye, approximately 3cm above the inferior border of the mandible
- The central ray is angled perpendicular to the bisector through the middle of the canine with a vertical angulation of about -5 to -10 degrees
Question 2. Describe in detail about bisecting angle technique.
Or
Write a note on the principles of imaging. Describe the bisecting angle technique.
Answer.
Principle Of Imaging
- The focal spot should be as small as possible
- The focal spot-object distance should be as long as possible
- The object-film distance should be as small as possible
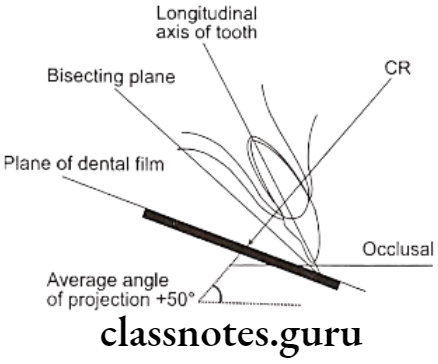
- The long axis of the object and the film planes should be parallel
- The X-ray beam should strike the object and the film planes at right angles
- There should be no movement of the tube, film, or patient during exposure
Bisecting Angle Technique:
- It is also called Short Cone Technique
- It is based on the principle known as “Ciesenzky’s rule of isometry”
- It states that the two triangles at equal if they have two equal angles and share a common side
- The X-ray beam should bisect the imaginary bisector that bisects the angle formed by the film and the long axis of the tooth
- When the rule is strictly followed, the resultant image obtained is accurate
Film Stabilization:
- The film-holding devices or the patient’s finger is used to position and stabilize the film
- The patient’s finger or thumb is used
- It is always placed behind the film and teeth
- The patient’s thumb is used to position maxillary films
- While index finger to stabilize Mandibular films
- The patient’s left hand is used for exposure on the right side of the mouth
- Right hand for exposure on the left side of the mouth
Guidelines:
- The white side of the film always faces the teeth
- Anterior films are always placed vertically
- Posterior films are always placed horizontally
- The incisal or occlusal edge of the film must extend approximately 1/8th inch beyond the incisal or occlusal surface of the tooth
- Always center the film over the area to be examined
- If the patient’s finger is used for stabilization, instruct the patient to gently push the film against the lingual/palatal surface of the tooth
Patient’s Position:
- Explain the procedure to the patient
- Position the patient comfortably on the chair
- Adjust the patient such that the arch being examined is parallel to the floor and the mid-sagittal plane is perpendicular to the floor
- Place and secure the lead aprons and thyroid collars
- Remove the accessories that may interfere with the exposure
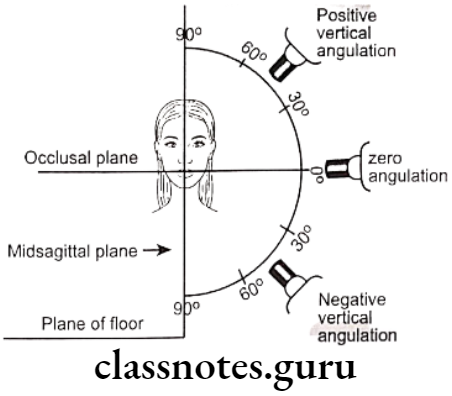
Angulations:
- Horizontal angulation is achieved by directing the central ray perpendicular to the curvature of the arch to be examined

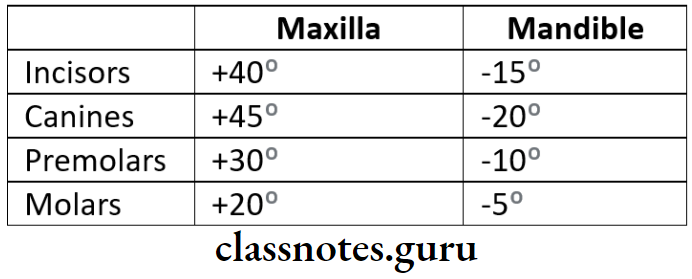
- Vertical angulations:
- Maxillary teeth
- Incisors: +40 to +50
- Canines: +45 to +55
- Premolars: +30 to +40
- Molars: +20 to +30
- Mandibular teeth
- Incisors: -15 to -25
- Canines: -20 to -30
- Premolars: -10 to -15
- Molars: -5 to 0
Basic Rules:
- Film placement: the film should be placed to cover the area of interest
- Film position – the film must be placed against the lingual surface of the tooth
- Vertical angulation: the central ray of the X-ray beam must be directed perpendicular to the image of the bisector that divides the angle formed by the film and the long axis of the tooth
- Horizontal angulation: the central beam must be directed through the contact areas between the teeth
- Film exposure – the center of the beam should be such that all the areas of the film are exposed
Advantages:
- It can be used in patients with shallow palate, bony growth
- It is quick and comfortable
- Decreased exposure time required
- Short PID is used
- If angulations are correct, the image obtained is of the same size
- No sterilization of holders is required as they are not used
Disadvantages:
- Image distortion may occur due to the use of short PID
- By using a film holder it becomes difficult to visualize the imaginary bisector
- Incorrect horizontal angulation results in overlapping
- Incorrect vertical angulation leads to elongation or foreshortening
- If the patient’s finger is used for stabilization, the patient may shift the film before or during exposure
- The patient’s hand is exposed unnecessarily
- The periodontal tissues are poorly represented
- Overlapping of shadows of Zygomatic bone occurs
- The Buccal roots of premolars and molars are foreshortened
- The crowns of the teeth are often distorted
Question 3. Enumerate types of intraoral radiographs. Describe briefly the technique of obtaining IOPA if the maxillary central incisor.
Answer.
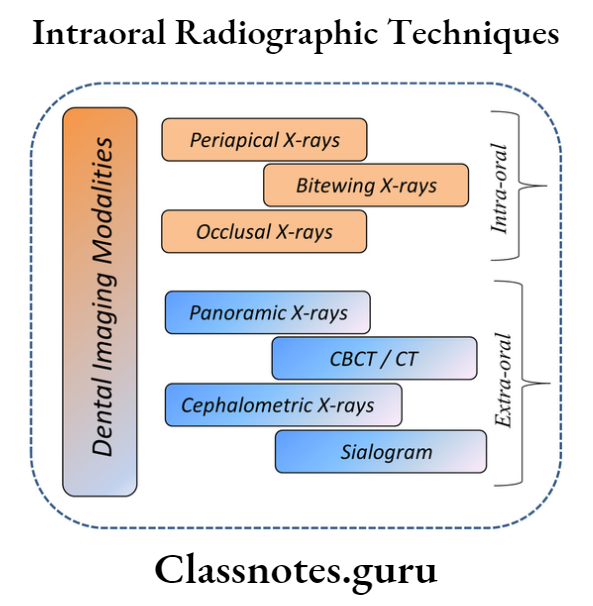
Intraoral Radiographic Techniques:
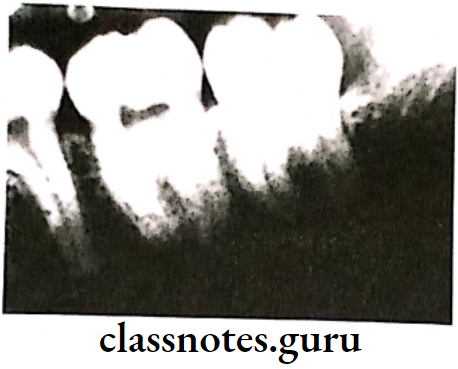
- Periapical showing all of the tooth and the surrounding bone
- Bite-wing showing crowns of maxillary and Mandibular teeth and adjacent alveolar crests
- Occlusal shows images of the incisal edges and occlusal surfaces of teeth and cross-section of the dental arches
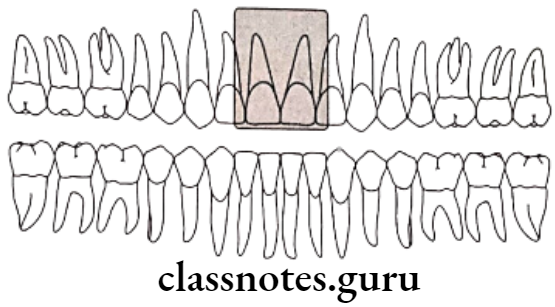
Technique For Obtaining Radiograph Of Maxillary Central Incisor:
- Parallel technique:
- Image Field:
- The film should include both the central incisors and their periapical areas
- Film placement:
- It should be placed at the level of the second premolars or first molars
- The long axis should be parallel to the long axis of the maxillary central incisors
- Projection of the Central Ray:
- Directed high on the lip in the midline, just below the septum of the nostrils
- Through the high of the lip in the midline, just below the septum of the nostrils
- It should be perpendicular to the plane of the film and the roots of the teeth
- Vertical Angulation 15 to 20:
- Image Field:
- Bisecting angle technique:
- Image Field:
- It should include both the central incisors
- Film Placement:
- The film is placed behind the maxillary central incisors
- It is placed in the line with the midline of the arch
- The film is placed with the superior border extending just beyond the incisal edges of the teeth
- Projection of Central Ray:
- The point of entry is through the midline, through the tip of the nose, through the contact point of the central incisors
- It should be perpendicular to the plane bisecting the angle between the long axis of the film and the roots of the teeth
Angulation +45 to +50
- Image Field:

Question 4. How will you take an intraoral radiograph using a long cone technique?
Answer.
- In this technique the X-ray film is placed parallel to the long axis of the tooth and the central ray of the X-ray beam is directed at right angles to the tooth and film
- The film must be placed away from the tooth and towards the middle of the oral cavity
- The object film distance must be increased
- It is also referred to as the long-cone technique
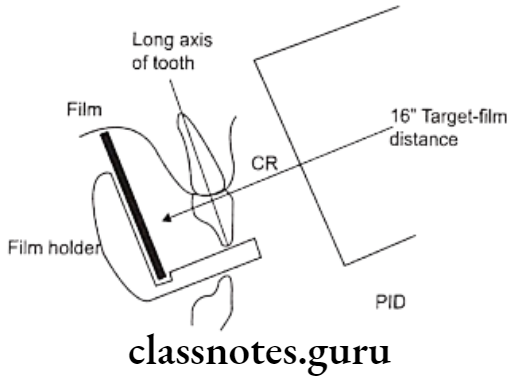
Target Film Distance:
- The target film distance is large
- This results in less image magnification and better definition
Film Holders:
- This technique requires filmholders
Film:
- Ideally, the size of the film used will depend upon the teeth being radiographed
- Size 1: used for interiors
- Size 2: used for posteriors
Film Placement:
- The white side of the film always faces the teeth
- For interiors, the film is placed vertically
- For posteriors, the film is placed horizontally
- The identification dot on the film is always placed toward the occlusal surface
- Always place the film away from the teeth and towards the middle of the oral cavity
- The film must be positioned to cover the prescribed area of the teeth to be examined
Patient Position:
- Explain the procedure to the patient
- Position the patient comfortably on the chair
- Adjust the patient’s head such that the occlusal place of the upper arch is parallel to the floor
- Mid sagittal plane is perpendicular to the floor
- Secure lead apron and thyroid collar
- Remove all objects from the mouth that may interfere with the film exposure
Basic Rules:
- Film placement film must cover the prescribed area of the teeth to be examined
- Film position the film must be placed parallel to the long axis of the tooth
- The holder is rotated so that the teeth to be examined are touching the block
- The correct focal spot to film distance is determined
- In vertical angulation, the central ray of the X-ray beam is directed perpendicular to ,the film and the long axis of the tooth
- In horizontal, regulation the central ray of the X-ray beam is directed through the contact areas of the film are exposed
- Film exposure the X-ray beam must be centered on the film to ensure that all areas of the film are exposed
Exposure is made

Advantages:
- This technique produces an image that has dimensional accuracy
- It is simple and easy to learn and use
- It is easy to standardize and can be accurately duplicated or repeated
- Facial screens can be used
- There is decreased secondary radiation
- The shadow of the Zygomatic bone appears above the apices of the molar teeth
- The periodontal levels are well represented
- There is minimal foreshortening or elongation
- Good detection of interproximal caries
- Useful in handicapped and compromised patients as the relative position of the film packet, teeth, and X-ray beam are always maintained
Disadvantages:
- The film-holding device is difficult to place in children and patients with shallow palate
- The film-holding device causes discomfort to the patient
- Object film distance is increased
- There is an increase in the exposure time
- It is more space-consuming
- Sometimes the apices of the teeth are very close to the edge of the film and so not well appreciated
- The holders need to be autoclaved
Question 5. Discuss techniques of intraoral periapical radiographs and advantages and disadvantages
Answer.
Intraoral Periapical Techniques
Bisecting Angle Technique:
- It is also called Short Cone Technique
- It is based on the principle known as “Ciesenzky’s of isometry”
- It states that the two triangles are equal if they have two equal angles and share a common side
- The X-ray beam should bisect the imaginary bisector that bisects the angle formed by the film and the long axis of the tooth
- When the rule is strictly followed, the resultant image obtained is accurate
Bisecting Angle Technique Guidelines:
- The white side of the film always faces the teeth
- Anterior films are always placed vertically
- Posterior films are always placed horizontally
- The incisal or occlusal edge of the film must extend approximately 1/8th inch beyond the incisal or occlusal surface of the tooth
- Always center the film over the area to be examined
- If the patient’s finger is used for stabilization, instruct the patient to gently push the film against the lingual/palatal surface of the tooth
Bisecting Angle Technique Basic Rules:
- Film placement: the film should be placed to cover the area of interest
- Film position – the film must be placed against the lingual surface of the tooth
- Vertical angulation: the central ray of the X-ray beam must be directed perpendicular to the image of the bisector that divides the angle formed by the film and the long axis of the tooth
- Horizontal angulation: the central beam must be directed through the contact areas between the teeth
- Film exposure – the center of the beam should be such that all the areas of the film are exposed
Bisecting Angle Technique Advantages:
- It can be used in patients with shallow palate, bony growth
- It is quick and comfortable
- Decreased exposure time required
- Short PID is used
- If angulations are correct, the image obtained is of the same size
- No sterilization of holders is required as they are not used
Bisecting Angle Technique Disadvantages:
- Image distortion may occur due to the use of short PID
- By using a film holder it becomes difficult to visualize the imaginary bisector
- Incorrect horizontal angulation results in overlapping
- Incorrect vertical angulation leads to elongation or foreshortening
- If the patient’s finger is used for stabilization, the patient may shift the film before or during exposure
- The patient’s hand is exposed unnecessarily
- The periodontal tissues are poorly represented
- Overlapping of shadows of Zygomatic bone occurs
- The Buccal roots of premolars and molars are foreshortened
- The crowns of the teeth are often distorted
Parallel Technique
- In this technique the X-ray film is placed parallel to the long axis of the tooth and the central ray of the X-ray beam is directed at right angles to the tooth and film
- The film must be placed away from the tooth and towards the middle of the oral cavity
- The object film distance must be increased
- It is also referred to long-coming cone technique
Parallel Technique Basic Rules:
- Film placement film must cover the prescribed area of the teeth to be examined
- Film position the film must be placed parallel to the long axis of the tooth
- The holder is rotated so that the teeth to be examined are touching the block
- The correct focal spot to film distance is determined
- In vertical angulation, the central ray of the X-ray beam is directed perpendicular to, the film and the long axis of the tooth
- Horizontal, regulation the central ray of the X-ray beam is directed through the contact areas of the film are exposed
- Film exposure the X-ray beam must be centered on the film to ensure that all areas of the film are exposed
- Exposure is made
Parallel Technique Advantages:
- This technique produces an image that has dimensional accuracy
- It is simple and easy to learn and use
- It is easy to standardize and can be accurately duplicated or repeated
- Facial screens can be used
- There is decreased secondary radiation
- The shadow of the Zygomatic bone appears above the apices of the molar teeth
- The periodontal levels are well represented
- There is minimal foreshortening or elongation
- Good detection of interproximal caries
- Useful in handicapped and compromised patients as the relative position of the film packet, teeth, and X-ray beam are always maintained
Parallel Technique Disadvantages:
- The film-holding device is difficult to place in children and patients with shallow palate
- The film-holding device causes discomfort to the patient
- Object film distance is increased
- There is an increase in the exposure time
- It is more space-consuming
- Sometimes the apices of the teeth are very close to the edge of the film and so not well appreciated
- The holders need to be autoclaved
Intraoral Radiographic Techniques Short Answers
Question 1. Indicates for bitewing technique.
Answer.
Indicates for bitewing technique
- Detection of interproximal caries
- Monitoring the progression of dental caries
- Detection of secondary caries
- Evaluating periodontal conditions
- Useful for evaluating alveolar bone crest and changes in height
- For detecting calculus deposited in the interproximal areas
Question 2. Angulations for upper molar.
Answer.
Angulations for upper molar
- For the bisecting angle technique
- Universal standard +20 to +30
- Indian standard +30
- For parallel technique
- It is perpendicular to the film
- For bitewing technique
- The central ray is directed at +10 degrees to the occlusal plane
Question 3. Duplicate radiographs.
Answer.`
Duplicate radiographs
- Used to separate patient’s records, insurance party, and third-party requirements
Types of methods used for it
- Photographic method
- Most common method
- Film is exposed to a source of light and then subjected to transillumination
- A radiograph is placed between the light source and the film
- Double film packet
- Used for intraoral and extraoral films
- Radiographic method
- X-rays and intensifying screens are used
- In this, the intensifying screens should be kept above, then reverse film, and then unexposed film.