
Specialized Radiographic Techniques Long Essays
Question 1. Enumerate techniques for TMJ imaging. Describe any two in detail.
Answer.
Techniques For TMJ Imaging:
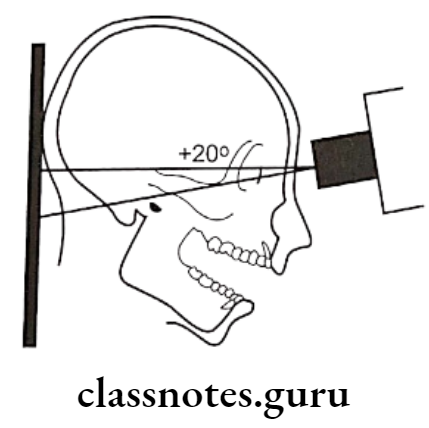
- Transcranial projection:
- Structure Seen:
- Useful in detecting arthritis of the articular surfaces
- To evaluate the joint’s bony relationship
- Film Position:
- The cassette is placed against the patient’s ear and centered over the TMJ of interest
- It is placed parallel to the sagittal plane
- Patient’s Position:
- The sagittal plane must be vertical
- The ala tragus line should be parallel to the floor
- The view is taken with
- Open mouth
- Rest position
- Closed mouth
- Central Ray:
- It differs according to the technique
- Postauricular
- Point of entry is 1/2 “behind and 2” above the auditory meatus
- Grewcock approach
- The path of entry is through point 2 above the auditory meatus
- Gill’s approach
- Point of entry is 1/2 “anterior and 2” above the auditory meatus
- Angulation: +20º To +25º
- Point Of Exit: TMJ of interest
- Structure Seen:
Specialized radiographic techniques long essay
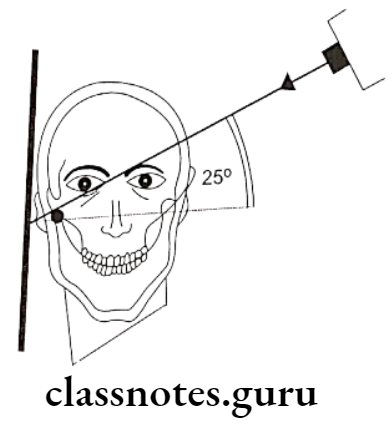
A – Transcranial projection, the central ray is oriented at 25º positive angle from the opposite side and anteriorly 20º, centered over the TMJ of interest, mouth closed
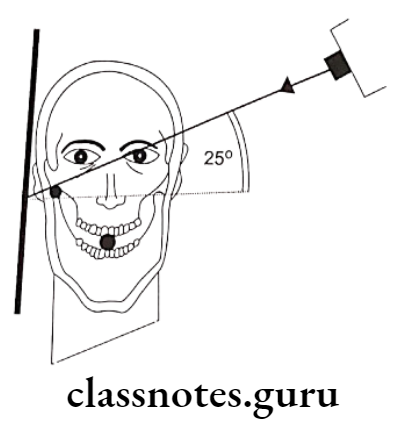
B – Transcranial projection, the central ray is oriented at 25º positive angle from the opposite side and anteriorly 20º, centered over the TMJ of interest, mouth open
- Tranpharyngeal projection:
- Structures Seen:
- The medial surface of the condylar head and neck
- Film Placement:
- The cassette is placed flat against the patient’s ear
- It is centered to a point 1/2″ anterior to the external auditory meatus, over the TMJ of interest
- Structures Seen:
Read And Learn More: Oral Radiology Question and Answers
- Position of the Patient:
- The sagittal plane should be vertical and parallel to the film
- The film is centered to a point 1/2 “anterior to the external auditory meatus
- The occlusal plane should be parallel to the transverse axis of the film
- The patient should open his mouth
- Central Ray:
- It is directed from the opposite side cranially at an angle of -5 to -10 degrees posteriorly
- It is directed through the Mandibular notch of the opposite side below the base of the skull to the TMJ of interest
- Position of the Patient:
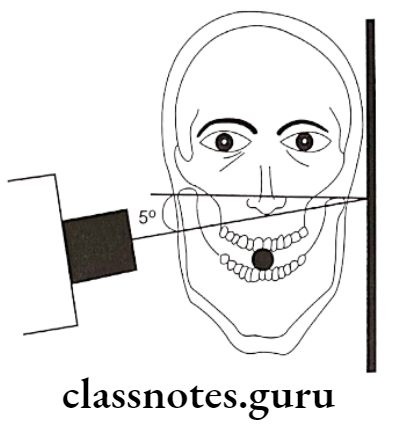
A – Transpharyngeal projection. The central ray is oriented superiorly 5º to 10º and posteriorly approximately 10º, centered over the TMJ of interest. The mandible is positioned at the maximal opening
Long essay on advanced radiographic techniques
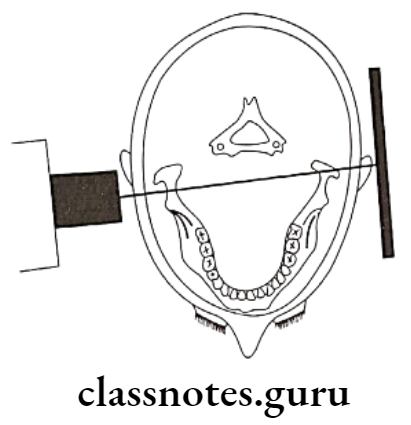
B – Transpharyngeal projection, showing positioning from above, showing the X-ray beam aimed slightly posteriorly across the pharynx
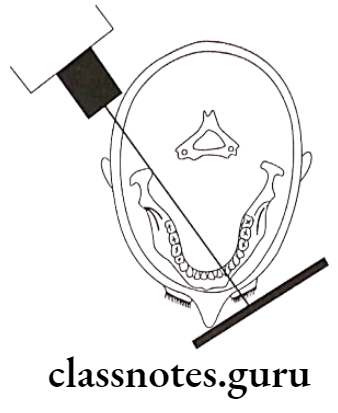
- Transorbital Projection:
- Structures Seen:
- The anterior view of TMJ
- Film Placement:
- The film is positioned behind the patient’s head at an angle of 45 degrees to the sagittal plane
- Position of the Patient:
- The Sagittal Plane should be vertical
- The canthomeatal line should be 10 degrees to the horizontal
- Head tipped downwards
- The mouth should be widely open
- Central Ray:
- Directed to the joint of interest at an angle of +20 degree
- Strike the cassette at a right angle
- Point of entry
- A pupil of the same eye
- Medial canthus of the same eye
- Medial canthus of the opposite eye
- Structures Seen:
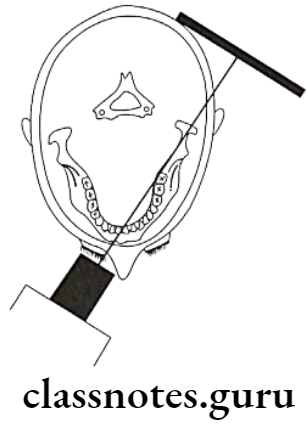
A – Transorbital projection, the central ray is oriented downward approximately 20º and laterally approximately 30º through the contralateral orbit, centered over the TMJ of interest
B – Transorbital projection, positioning from above, showing the cassette behind the condyletown’sray beam aimed across the orbit
- Reverse towne’s projection:
- Structures Seen:
- Condylar head and neck
- Film placement:
- The cassette is placed perpendicular to the floor
- Position of the Patient:
- The sagittal plane should be vertical and perpendicular to the film
- Lips should be centered on the film
- Only the patient’s forehead should touch the film
- The patient is asked to keep his mouth wide open
- Angulation is -30º to the film
- Central Ray:
- It is directed through the midsagittal plane at the level of the mandible
- It is perpendicular to the film
- Structures Seen:
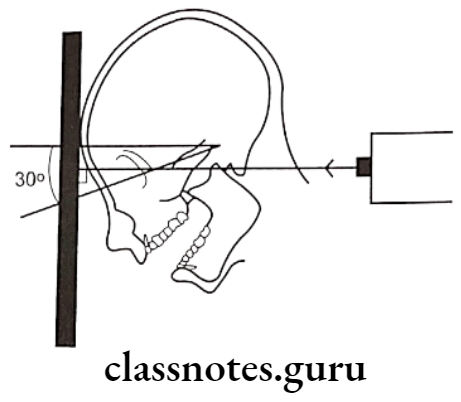
Diagram for the positioning of Reverse Towne’s projection, the radiographic baseline is 30º to the film and the X-ray is directed perpendicular to the film
Essay on special imaging techniques in radiology
Question 2. Describe sialography in detail.
Or
Describe indications, contraindications, and technique of sialography.
Or
Describe sialography and write on its signs in various salivary gland disorders.
Answer.
Sialography Indications:
- Detection of calculus or foreign bodies
- Determination of the extent of destruction of the gland secondary to obstructing calculi or foreign bodies
- Detection of fistula, diverticula, or strictures
- Determination and diagnosis of recurrent swellings and inflammatory processes
- Demonstration of a tumor and the determination of its location, size, and origin
- Selection of a site for biopsy
- Outline of the plane of the facial nerve
- Detection of residual stones
- Sialography can be used for therapeutic procedures
Sialography Contradictations:
- Patients with knowacutesitivity of iodine
- During the presence of avute inflammation
- It may interfere with subsequent thyroid function tests
Sialography Technique:
- Identification of duct:
- The parotid duct is located at the base of the papilla in the buccal mucosa adjacent to the first or second molar
- The area over the mucosa should be dried with a small sponge
- The submandibular duct orifice is situated on the summit of the small papilla at the side of the lingual frenum
- Exploring of the duct:
- The duct can be explored with a lacrimal probe
- In the case of the submandibular duct, the probe should pass through the length of the floor of the mouth to the level of the posterior border of the mylohyoid muscle i.e. about 5cm
- Eversion of the cheek should be done in case of parotid duct
- By it, the duct is adequately enlarged
- Introduction of cannula:
- The sialographic cannula is inserted into the duct so that the tissue stop presses firmly into the orifice to prevent dye reflux
- Introduce contrasting media:
- Liquid-soluble or water-soluble agents are slowly introduced
- Amount of the agent:
- Submandibular gland: 0.5 – 0.75 ml
- Parotid gland 0.76 – 1ml
- Radiograph is taken:
- Occlusal view/ lateral oblique view is sialolith delineate the submandibular gland
- view itith is better viewed in an occlusal view
- AP viewit is used for both the glands
- It demonstrates the medial and lateral gland structures
- Evacuation:
- After the radiography is taken, the cannula should be removed
- The patient is instructed to chew gum or the lemon slice and then asked to rinse
- This is done to stimulate the gland and cause excretion of the dye
Radiographic Appearance In Different Disorders:
- Parotid Gland – tree in winter appearance
- Submandibular gland – Bush in winter appearance
- Sjogren’s syndrome – Cherry blossom appearance
- Results in thinning of individual ducts and decrease in number of ducts
- Malignant tumor – Ball holding in hand appearance
- Stones within duct
- Results in filling defect distal to the site of obstruction
- There can be dilatation of the duct proximal to the obstruction
Specialized dental radiography procedures essay
Question 3. Enumerate various radiographic techniques for the diagnosis of fracture of the mandible.
Answer.
Radiographic Techniques For Diagnosis Of Fracture Of Mandible:
- Orthopantomogram:
- It is a technique for producing a single tomographic image of the facial structures that induce both the maxillary and mandible dental arches and their supporting structures
- Principle:
- This is based on the curvilinear variant of conventional tomography
- The movement of the tube head and the film produces images through the process known as tomography
- Curvilinear tomography is also based on the principle of reciprocal movement of an X-ray source and an image receptor around a central point or plane called an image layer
- Procedure:
- Explain the procedure to the patient
- Make the patient remove all the accessories that may interfere with the image
- Position the patient such that he is in the focal trough
- Instruct the patient to look straight
- The patient is positioned such that dental arches are located in the middle of the focal trough
- Mid sagittal plane is kept perpendicular to the floor
- The patient back and spine are adjusted in an erect position
- The occlusal plane is adjusted such that the Frankfort plane is parallel to the floor
- This is done by placing the central incisor into a notched incisal device with a lead marker
- Center the lower border of the mandible on the chin rest and is equidistant
- Instruct the patient to position the tongue on the palate
- Exposure the film
- Process it as usual
- Lateral oblique view:
- Anterior body of the mandible:
- Structures Seen:
- Anterior body of mandible
- Position of teeth in that region
- Film Placement:
- The cassette is placed flat against the patient’s cheek
- It is centered over the body of the mandible overlying the canine
- Position of the Patient:
- The ala tragus line should be parallel to the floor
- The mandible iscassetteded slightly
- The inferior border of the casette should be parallel to the lower border of the mandible
- The sagittal plane is tilted so that it is 5º to the vertical and rotated 30º from the true lateral poscassettehe nose and chin should approximate the casette
- Central Ray:
- Directed from 2 cm below the angle of the mandible opposite to the side of interest
- The beam is directed upward from -10º to -15º
- It is centered on the anterior body of the mandible
- The beam is directed perpendicular to the horizontal plane of the film
- Structures Seen:
- Anterior body of the mandible:
Advanced radiographic imaging methods essay
Diagram for the positioning of lateral oblique projection for the anterior body of the mandible, the film is in contact with the cheek at the canine area, and the X-ray beam aims at the canine area, through the radiographic keyhole
- Posterior Body:
- Structures Seen:
- Body of the mandible
- Position of teeth in that area
- Ramus of the mandible
- The angle of the mandible
- Film Placement:
- The cassette is placed against the patient’s cheek
- It is centered over the body of the mandible
- The cassette is placed parallel to the body of the mandible
- Position of the Patient:
- The ala tragusprotruded parallel to the floor
- The mandible is protuded slightly
- The inferior border of the cassette should be parallel to the lower border of the mandible and below it
- The sagittal plane is tilted to 5º to the vertical
- The head is rotated 10º to 15º from the true lateral position
- Central Ray:
- It is directed from 2 cm below the angle of the mandible opposite to the side of interest
- The beam is directed upwards (-10º to -15º)
- It is centered on the body of the mandible
- Structures Seen:
- Posterior Body:

The diagram for the positioning of lateral oblique projection for the posterior body of the mandible film is in contact with the cheek at the premolar area, and the X-ray beam aims at the premolar area, through the radiographic keyhole
- Ramus of Mandible:
- Structures Seen:
- Ramus from the angle of the mandible to the condyles
- Film Placement:
- The cassette is placed against the patient’s cheek
- It is centered over the ramus of the mandible
- It should be parallel to the ramus
- Position of the Patient:
- The ala tragus line should be parallel to the floor
- The mandible protrudes slightly
- The inferior border should be parallel to the lower border of the mandible and below it
- The sagittal plane is tilted 10º to the vertical
- The head is rotated 5º from the true lateral
- Central Ray:
- It is directed from 2 cm below the angle of the angle of the mandible opposite to the side of interest to a point posterior to the third molar region
- The beam is directed upwards (-10º to -15º)
- It is centered on the ramus of the mandible
- Structures Seen:
- Posteroanterior or anteroposterior view:
- Film Placement:
- The cassette is placed perpendicular to the floor
- Position of the Patient:
- The mid-sagittal plane should be perpendicular to the plane of the film
- The patient’s head is extended so that only the chin touches the cassette
- The cassette is centered around the acanthion
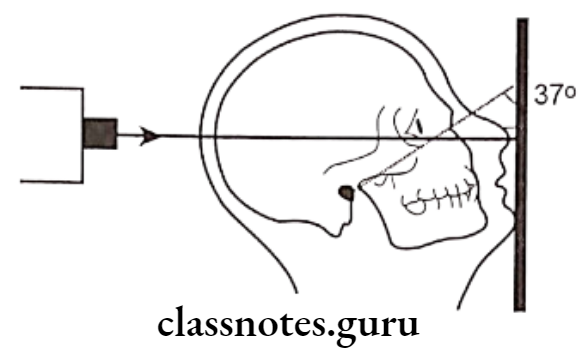
- The canthomeatal line should be 37º to the plane of the film
- The line from the external auditory meatus to the mental protuberance should be perpendicular to the film
- Central Ray:
- It is directed perpendicular and to the midpoint of the film
- It enters from the vertex and exists from the acanthion
- Film Placement:
Extraoral radiographic techniques long essay
Diagram for the positioning of PA water’s projection, the radiographic baseline is at 37º to the film, and the X-ray is perpendicular to the film
- Reverse Towne view:
- Film Placement:
- The cassette is placed perpendicular to the floor
- Position of the Patient:
- The sagittal plane should be vertical and peronndicular to the film
- Lips should be centered to the film
- Only the patient’s forehead should touch the film
- The patient is asked to keep his mouth wide open
- Angulation is -30º to the film
- Central Ray:
- It is directed through the midsagittal plane at the level of the mandible
- It is perpendicular to the film
- Film Placement:

Specialized X-ray techniques essay
Diagram for the positioning of Reverse Towne’s projection, the radiographic baseline is 30ºto the film, and the X-ray is directed perpendicular to the film