Question 1. Define rests and rest seats. Discuss the various types of rests, their functions, and their design considerations.
Answer:
1. Rest: It is defined as “A rigid extension of a fixed or removable partial denture which contacts a remaining tooth or teeth to dissipate vertical or horizontal forces.”
Removable Partial Dentures Long Essay
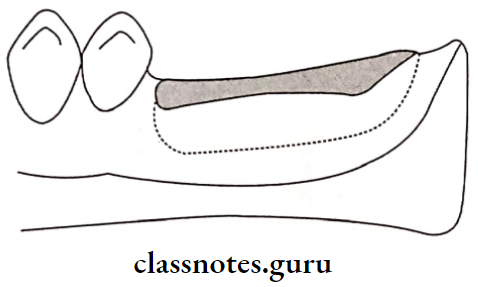
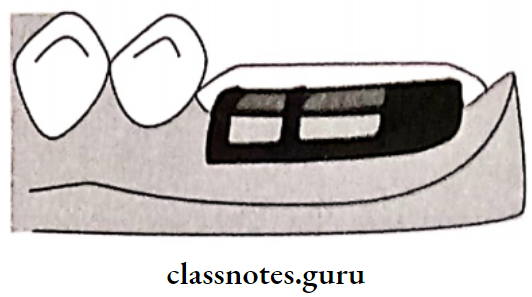
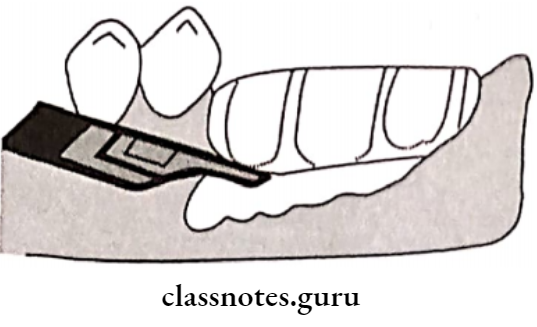
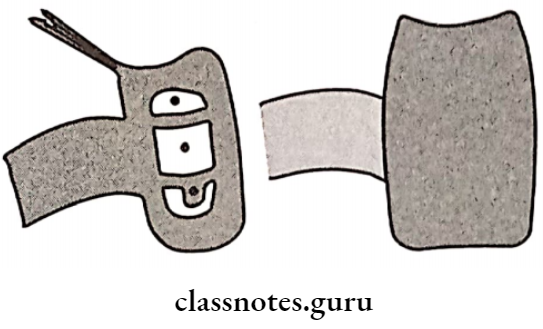
2. Rest Seat: The prepared recess in a tooth or restoration created to receive the occlusal, incisal, cingulum or lingual rest
- Types Of Rest Seat:
- Based on the relation of rest to the direct retainer
- Primary rest-placed along the clasp assembly
- Secondary rest placed away from the clasp
- Based on the relation of rest to the direct retainer
Read And Learn More: Prosthodontics Question And Answers
- Based on the position of the rest
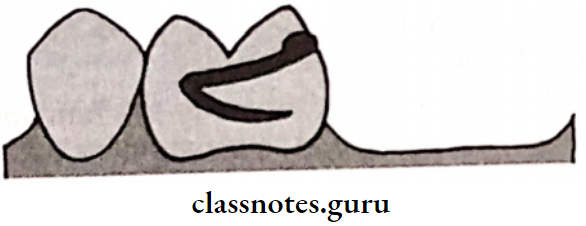
- Occlusal rest placed on occlusal surface of posterior
- Cingulum rest placed on lingual surface of the tooth
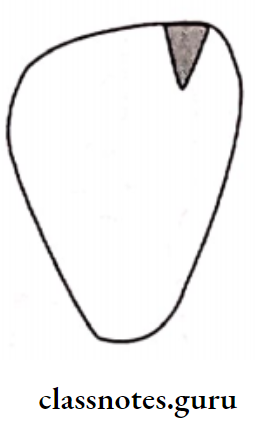
- Incisal rest-placed on the incisal edge of the tooth
- Based on the position of the rest
Question 2. Define indirect retainer. What are the functions of an indirect retainer?
Or
Write about various forms of indirect retainers in detail.
Or
Define indirect retainers and discuss in detail about various types of it.
Answer:
Indirect Retainers:
Indirect Retainers is defined as “a part of a removable partial denture which assists the direct retainers in preventing displacement of distal extension denture bases by functioning through lever action on the opposite side of the fulcrum line.

Functions Of Indirect Retainers:
- Indirect Retainers counteract the lifting forces and stabilizes the denture It counteracts horizontal forces and provide stability and support to the denture
- Indirect Retainers can splint and protect the anterior teeth
- Indirect Retainers may act as an auxillary rest
- The dislodgement of indirect retainer suggest the need of relining.
Types Of Indirect Retainers:
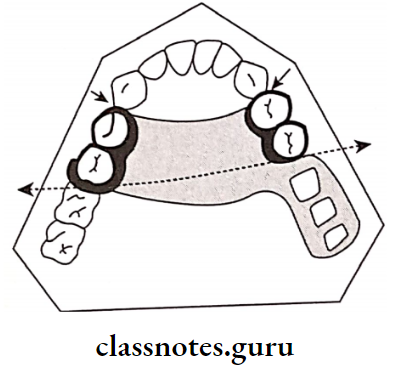
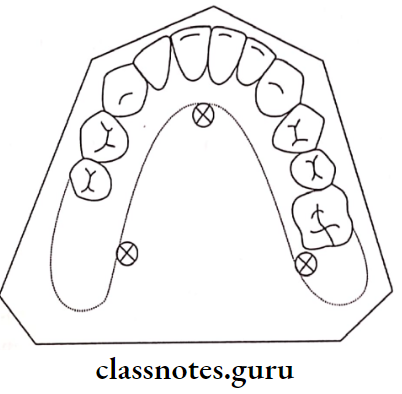
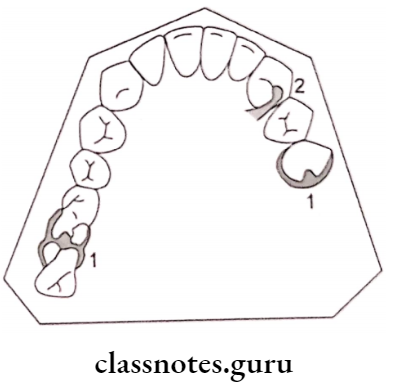
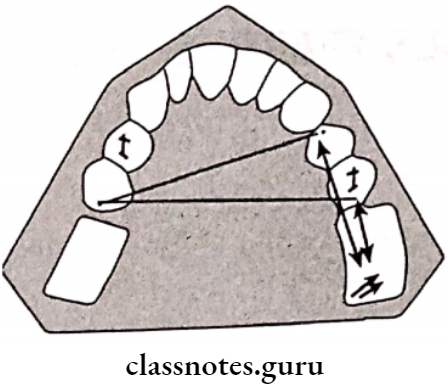
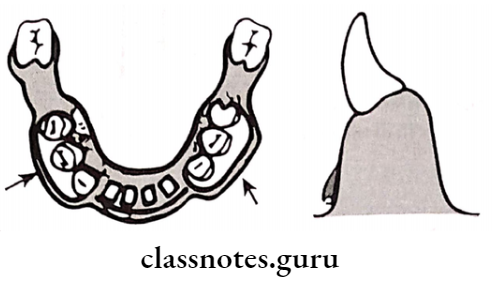
1. Auxillary Occlusal Rest:
- Auxillary Occlusal Rest is located on the occlusal surfaces away from the distal extension base
- Auxillary Occlusal Rest is placed perpendicular to the midpoint of the fulcrum line.
- Location:
- Bilaterally over 1st premolars in Kennedy’s class 1
- Over 1st premolar of opposite side in Kennedy’s class 2
- Location:
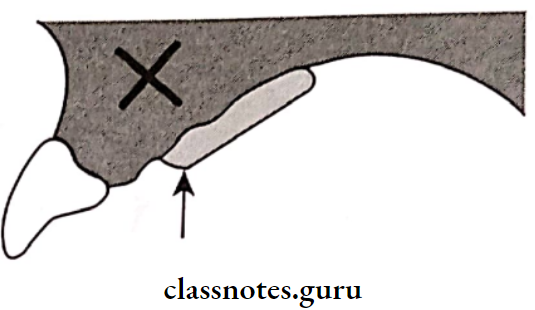
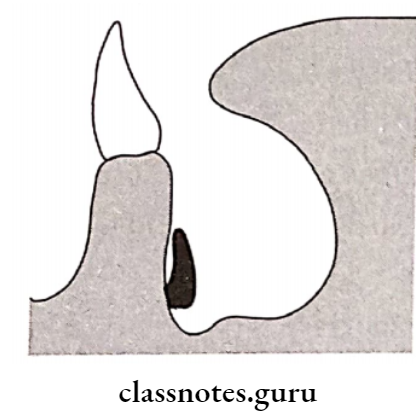
2. Canine Extension From The Occlusal Rest:
- Occlusal Rest is a finger-like extension from a premolar rest is placed on the lingual slope of the adjacent canine
- Occlusal Rest is used when the first premolar must also acts as a primary abutment
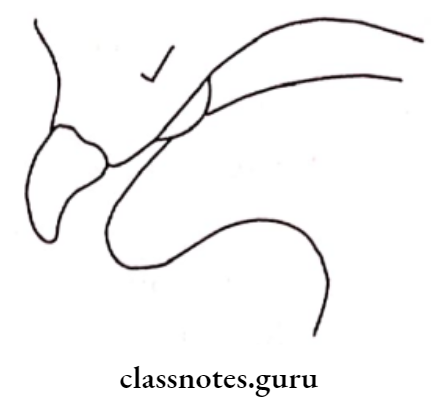
3. Canine Rest:
- If the mesial marginal ridge of the first premolar is close to the fulcrum line, canine rest is used.
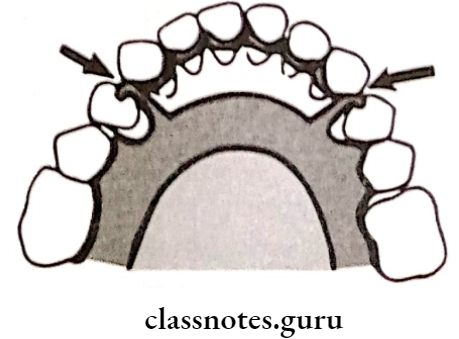
4. Continuous Bar Retainers And Lingual Plates:
- In Kennedy’s class I and class II, these retainers are placed just above the middle third of the anterior teeth to act as indirect retainers.
5. Modification Areas:
- In class 2 modification I, the fulcrum line runs from the left second premolar to the right second molar
- In such cases, the direct retainer resting on right first premolar act as an indirect retainer
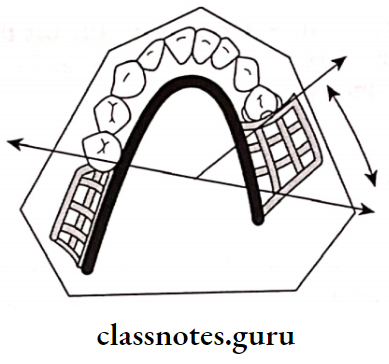
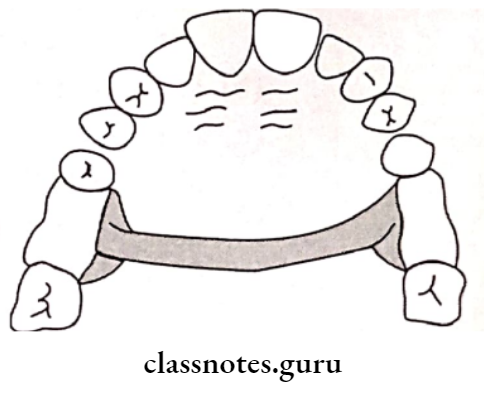
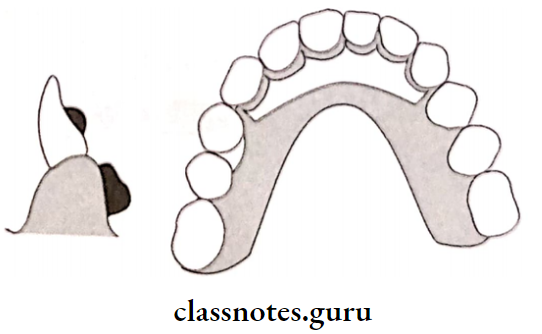
6. Rugae Support:
- As the rugae area is firm and well placed it can be used for indirect retention for a palatal horseshoe major connector.
- Horde shoe Connector lacks Posterior retention
- In this case ruge acts as indirect retainer
Removable Partial Denture Prosthodontics Notes
7. Direct Indirect Retention:
The reciprocal arm of a direct retainer located anterior to the fulcrum line may act as an indirect retainer.
8. Indirect Retention From Major Connector:
The major connector provides indirect rerention due to its rigidity
Question 3. Define direct retainers. Enumerate the requirements of direct retainers with a note on the circumferential clasp.
Answer:
Direct Retainers Definition:
Direct Retainers is defined as “A clasp or attachment placed on abutment tooth for the purpose of holding a removable denture in position
Direct Retainers Requirements:
- Passivity:
- The quality or condition of inactivity or rest assumed by the teeth, tissues, and denture when a removable partial denture is in place but not under masticatory pressure
- The retentive function should act only when dislodging forces are present
- Retention:
- It is that quality inherent in the prosthesis that resists the force of gravity, the adhesiveness of foods, and the forces associated with the opening of the jaws
- It is provided by the retentive arm of the clasp
- Reciprocation:
- It is defined as the means by which one part of a prosthesis is made to counter the effect created by another part
- It is provided by a rigid reciprocal arm
- It resists the stresses generated by the retentive arm
- Encirclement:
- It is the property of the clasp assembly to encompass more than 180 degrees of the abutment tooth either by continuous or broken contact to prevent dislodgement during the function
- Each clasp much encircle more than 180 degree of the abutment tooth
- There can be continuous contact or broken contact
- Stability:
- It is defined as the quality of a denture to be firm, steady, or constant to resist displacement by functional stresses and not to be subject to change of position when forces are applied
- Provided by shoulder and vertical arm of minor connector
- Support:
- It is defined as holding up or serving as a foundation or prop for
- It is resistance to the movement of the denture in a gingival direction provided by rest
- Path of escapement should never coincide with the path of removal
- Primary abutment should never exert tipping forces on the abutment
- Place reciprocal elements at the height of the contour and retentive element below the height of contour
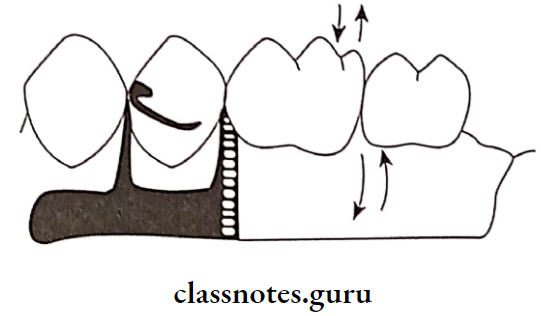
Circumferential Clasp/Maker’s Clasp
- These clasps embrace more than half of the abutment tooth
- Maker’s Clasp prevents the rotation of the denture
- They approach the undercut from an occlusal direction
Maker’s Clasp Advantages:
- Maker’s Clasp is easy to fabricate and repair
- Maker’s Clasp leads to less food retention
- Maker’s Clasp can be best applied in a tooth-supported partial denture
- Provides excellent support and retention
Maker’s Clasp Disadvantages:
- Maker’s Clasp covers a large tooth surface area
- Alters buccolingual width of the crown
- Interferes with the normal food flow
- This leads to food accumulation and decalcification of the tooth structure
- Deprives periodontal stimulation
- Maker’s Clasp cannot be used for cases with an undercut away from edentulous space
Question 4. Classify partial edentulous areas according to Applegate-Kennedy’s classification and mention Applegate’s rules for Kennedy’s classification.
Answer:
Applegate Kennedy’s classification:
- Proposed by Dr. Edward Kennedy in 1923
- Kennedy classified partially edentulous arches and not the dentures
- This classification is anatomical
- In Kennedy’s classification, he included 4 classes Further, 2 additional classes were included by Apple-gate
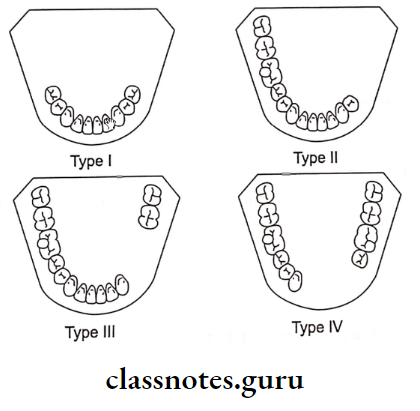
Applegate Kennedy’s Classification Is As Follows:
- Class 1:
- Bilateral edentulous areas located posterior to the remaining natural teeth
- There are two edentulous spaces located in the posterior region without any teeth posterior to it.
- Class 2:
- The unilateral edentulous area located posterior to the remaining natural teeth
- There is a single edentulous space located in the posterior region without any teeth posterior to it.
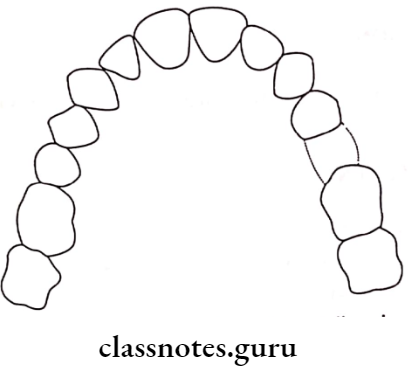
- Class 3:
- Unilateral edentulous area with natural teeth anterior and posterior to it.
- It indicates a single edentulous area that does not cross the midline of the arch
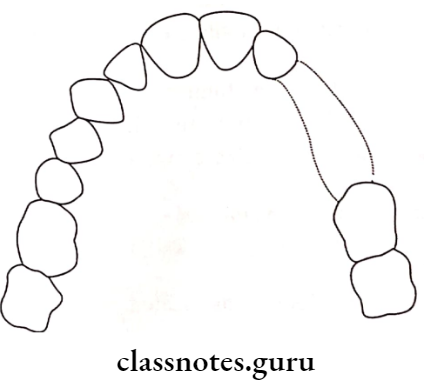
- Class 4:
- The single, bilateral edentulous area located anterior to the remaining natural teeth
- It crosses the midline of the arch
- Teeth are present only posterior to the edentulous arch
- Class 5:
- The edentulous area bounded anterior and posteriorly by natural teeth
- But the anterior abutment is not suitable for support
- Class 6:
- Edentulous area in which the teeth adjacent to the space are capable of total support of the required prosthesis
Applegate Kennedy’s Applegate’s Rules:
- Rule One: Classification should follow rather than preceed extractions that might alter the original classification
- Rule Two: If the third molar is missing and not to be replaced, it is not considered in the classification
- Rule Three: If the third molar is present and is used as abutment, it is considered in the classification
- Rule Four: If the second molar is missing and not to be replaced, it is not considered in the classification
- Rule Five: The most posterior edentulous area or areas always determine the classification
- Rule Six: Edentulous areas other than those, which determine the classification, are referred to as modification spaces and are designated by their number
- Rule Seven: The extent of the modification is not considered, only the number of additional edentulous spaces are considered
- Rule Eight: There can be no modification areas in class 4.
RPD Prosthodontics Long Questions
Question 5. Define surveyor. Mention its parts. Explain in detail step by step procedure in surveying and Functions.
Or
Define dental cast surveyor. Enumerate their function and Parts of surveyors.
Or
Describe the surveying procedure and Functions and Parts of surveyors.
Answer:
Definition Of Surveyor:
An instrument used in the construction of removable partial dentures to locate and delineate contours and relative positions of abutment teeth and associated structures
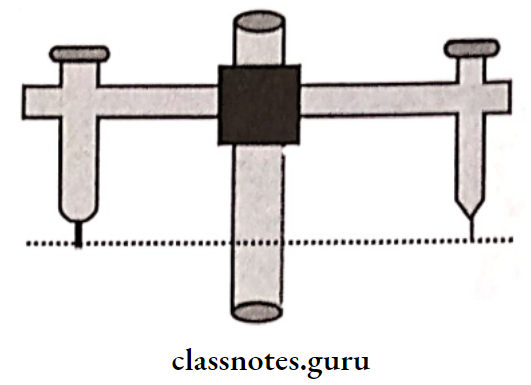
Parts Of Surveyor:
- Surveying Platform:
- The surveyor is metal plate parallel to the floor
- The surveyor forms base of the surveyor
- A Cast holder is placed over it
- Cast Holder/Surveying Table:
- Cast Holder has a base and table to place a cast
- Cast Holder should not be tilted more than 10 degrees
- Vertical Arm:
- The Vertical Arm arises vertically from the surveying platform
- Horizontal Arm:
- Vertical Arm extends from top of the vertical arm
- Vertical Arm supports the surveying arm at its free end
- Vertical Arm Variations:
- Fixed- in Ney surveyor
- Revolving- in Jelenko surveyor
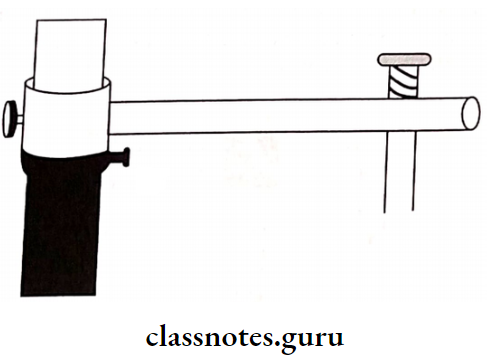
- Surveying Arm:
- Surveying Arm extends from free end of horizontal arm
- Surveying Arm is parallel to the vertical arm
- Surveying Arm can move upward and downward
- Its lower end has mandrel for attachment of surveying tools
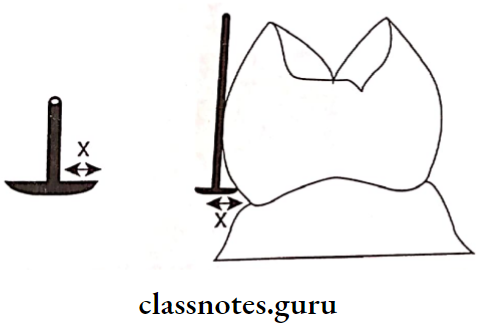
- SurveyingTools:
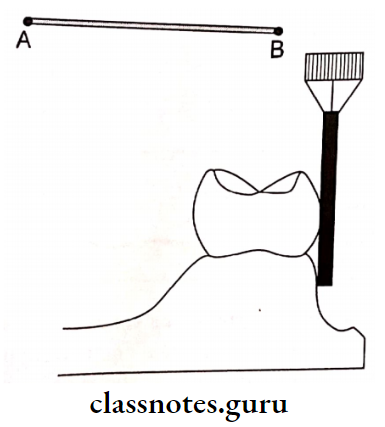
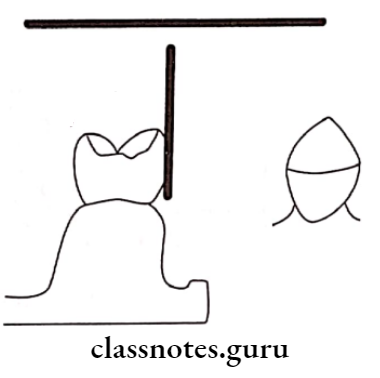
- Analyzing Rod:
- Analyzing Rod is solid cylindrical metal rod
- Analyzing Rod helps to analyze the location of height of contours, presence and absence of undercut
- Analyzing Rod helps to determine path of insertion
- Analyzing Rod:
- Carbon Markers:
- Carbon Markers resemble the lead points
- Carbon Markers are used to draw height of contour of the object
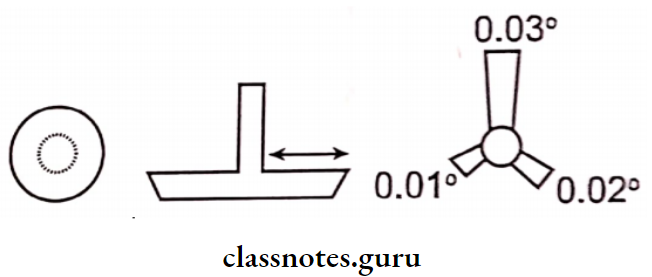
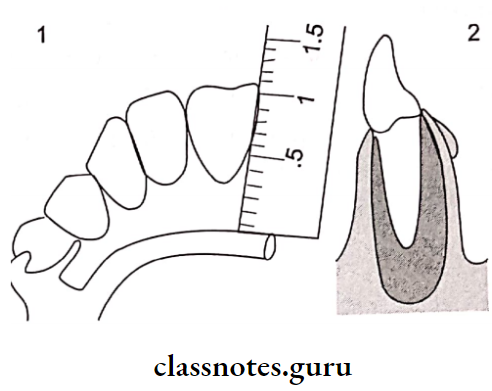
- Undercut Gauges:
- Undercut Gauges is used to measure the depth and location of the undercuts
- Sizes:
- According to Stewart-0.010″, 0.015″, 0.020″ According to McCracken- 0.010″, 0.020″, 0.030″
- Shape:
- Ney surveyor circular beaded
- Jelenko- Fan shpaed bead
- Carbon Markers:
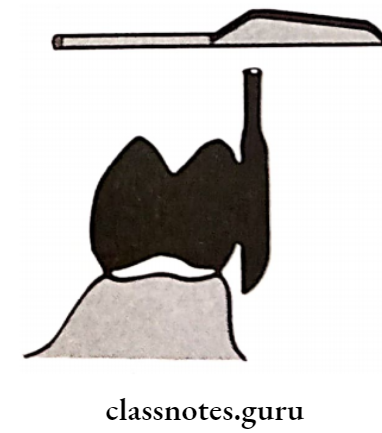
- Wax Knife:
- Used to trim the excess wax and to eliminate undesirable undercut
- Wax Knife:
Surveying Procedure:
- The primary cast is mounted on the surveying table It is locked in the position with a zero-degree tilt with the help of clamps on the surveying table
- Surveying is mounted such that the occlusal surfaces of the remaining teeth are parallel to the base
- After this, the surveying arm is positioned in relation to the cast
- Surveying is positioned as follows:
- First, the horizontal arm is adjusted vertically such that the surveying arm can contact at least three different spaced-out points on the cast
- Surveying is locked to the vertical arm with the help of a thumb screw Next, the cast is analyzed by using different analyzing tools
Components of Removable Partial Dentures Essay
Analyzing Tools:
- Analyzing Rod:
- Analyzing is the first surveying tool used
- Analyzing is attached to the mandrel of the surveying arm
- The cast is rotated against it to analyze the presence of undercuts whether favorable or unfavorable
- Carbon Markers:
- These resemble the lead points
- After analyzing the teeth with analysing rod, it is replaced by carbon markers
- These are used to draw survey lines, which denote the height of the contour of the teeth
- Undercut Gauges:
- Undercut Gauges are used to measure the depth and location of the undercuts in three dimensions
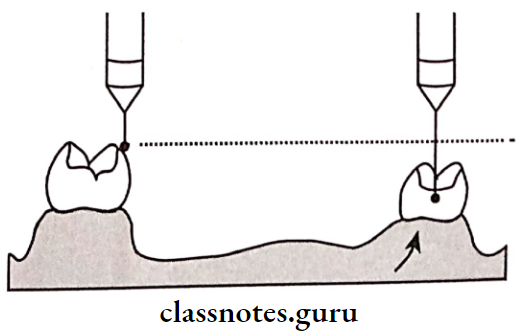
Tripoding:
- Tripoding is done next to maintain the records of the primary cast in the master cast
- A carbon marker is fixed to the mandrel of the surveying arm along with a locked horizontal arm
- The surveying arm is moved freely
- Due to this three points are marked that lie in the same plane
- Additional reference points are marked
- They are
- A distal marginal ridge of 1st premolar Incisal edge of the lateral incisor
- Lingual cusp tip of 1st premolar of opposite side
- After marking the primary cast is removed and the master cast is placed on the surveying table
- The master cast is adjusted in the surveying table such that the carbon marker contacts in the same manner as that with the primary cast
Functions of Surveyor:
- Surveying the diagnostic and primary casts
- Tripoding the cast
- Transferring the tripod marks to another cast
- Contouring wax pattern
- Contouring crowns and cast restoration
- Placing internal attachments and rests
- Performing mouth preparation on casts
- Surveying master cast
- Surveying ceramic veneer
Uses Of Tripoding:
- Helps in positioning the master cast
- Helps to remount the diagnostic casts on the surveying table
Question 6. Define major connector. Mention different types and discuss criteria for the selection of major connectors.
Answer:
Definition of Major Connectors:
Major Connectors is defined as “A part of a removable partial denture which connects the components on one side of the arch to the components on the opposite side of the arch”
Types Of Major Connectors:
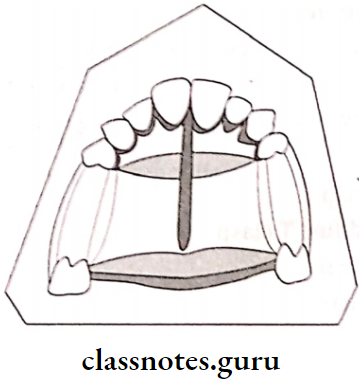
- Maxillary:
- Single posterior palatal bar
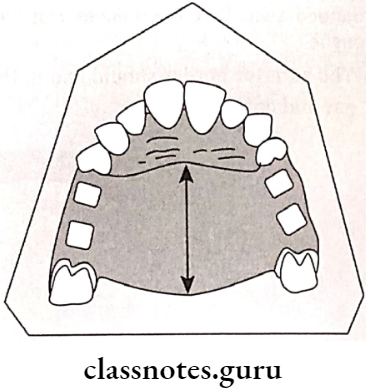
- Palatal strap
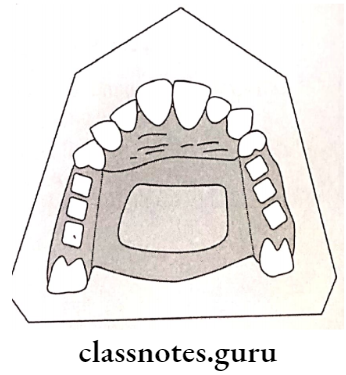
- Palatal plate
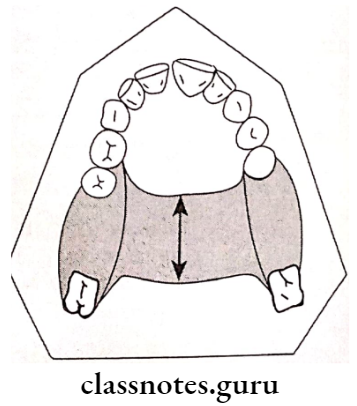
- Antero posterior palatal bar
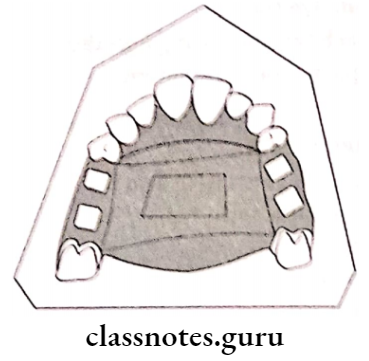
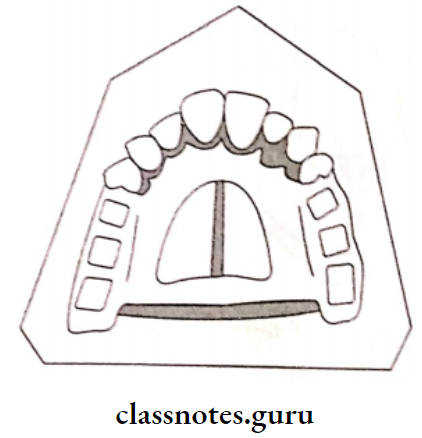
- Horseshoe connector Closed horseshoe
- Complete palate
- Mandibular:
- Lingual bar Lingual plate
- Kennedy bar
- Sublingual bar
- Cingulum bar
- Labial bar
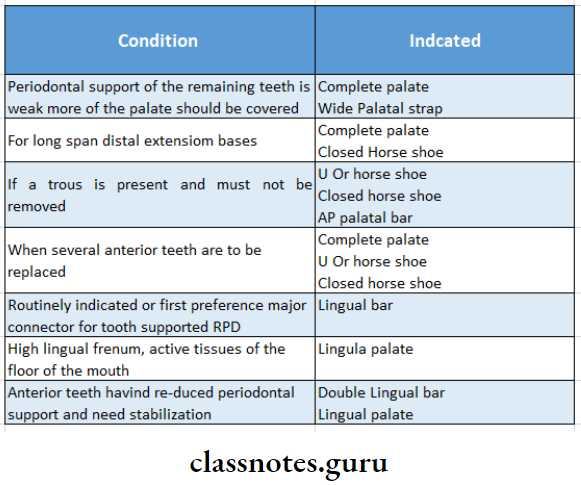
Criteria For Selection Of Major Connectors:
Major connector should fulfill the following criteria
- Functional Requirement: It should distribute forces among all the teeth
- Anatomical Restraints: In case of mandibular connector less space is present, hence connector is designed accordingly
- Relief: Adequate amount of releif should be provided
- Hygiene: It should be enable to clean the connector
- Patient’s Compliance:
- It should be accepted by the patient
- It should be comfortable
Question 7. Define removable partial denture. How do you choose a direct retainer for RPD.
Answer:
Removable Partial Denture:
- Any prosthesis that replaces some teeth in a partially dentate arch is called a removable partial denture
- It can be removed from the mouth and replaced at will
Classification of RPDs in Prosthodontics
Selection Of Direct Retainer For RPD:
Type of direct retainer is selected according to the following condition
Question 8. What is the direct retainer? Describe its parts
Answer:
Definition of Direct Retainer:
Direct Retainer is defined as “A clasp or attachment placed on an abutment tooth for the purpose of holding a removable denture in position
Parts of Direct Retainer:
1. Retentive Arm:
“A flexible segment of a removable partial denture which engages an undercut on an abutment and which is designed to retain the denture”
Retentive Arm Parts:
- Retentive Clasp Arm:
- It is not flexible
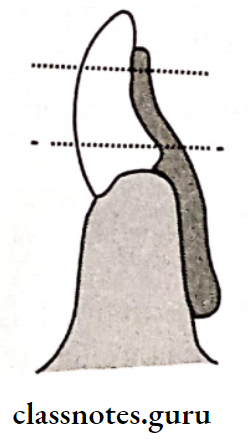
- It is located above the height of the contour
- Retentive Terminal:
- It is flexible
- It is located below the height of the contour
2. Reciprocal Arm:
- “A clasp arm or other extension used on a removable partial denture to oppose the action of some other part or parts of the prosthesis”
- Reciprocal Arm is located on the opposite side of retentive arm
- Reciprocal Arm is placed above the height of the contour
- Reciprocal Arm Functions:
- Acts as an indirect retainer
- Reciprocal Arm can resist the rocking of the denture base
- Reciprocal Arm provides stability and reciprocation against the retentive arm
- The denture is stabilized against horizontal movement
- Reciprocal Arm Functions:
3. Retentive Arm Shoulder:
- The shoulder is part of the clasp that connects the body to the clasp terminals
- The shoulder lies above the height of the contour and provides stabilization against horizontal displacement
4. Retentive Arm Body:
- The Retentive Arm is part of the clasp that connects the rests and shoulders of the clasp to the minor connector.
- Retentive Arm is rigidly above the height of the contour
- Retentive Arm is designed such that it contacts the guide plane of the abutment during insertion and removal
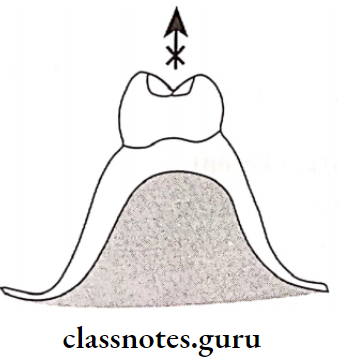
5.Retentive Arm Rest:
- Retentive Arm is rigid extension of the removable partial denture that contacts a remaining tooth or teeth to dissipate vertical or horizontal forces
- Retentive Arm is the part of the clasp that lies on the occlusal or lingual or incisal edge or surfaces of the tooth
- Retentive Arm resists tissue-ward movement of the clasp by acting like a vertical stop
6. Minor connector:
- Minor Connector is connecting link between the major connector or base of a removable partial denture and other units of the prosthesis, such as clasps, indirect retainers and occlusal rests
- Minor Connectror joins the clasp with the remaining part of the metal framework
Question 9. Discuss how to achieve stress equalization in Kennedy’s class 1 and 2 situations.
Answer:
Stress Equalization Or Stress Breaker:
This is used for stress equalization in Kennedy’s class I and II situation
Definition of Stress Breaker:
A device that relieves the abutment teeth of all or part of the occlusal forces
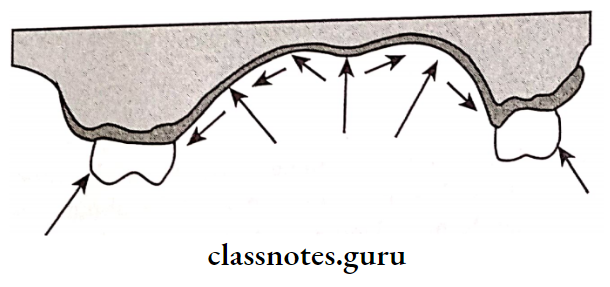
Significance of Stress Breaker:
- In a tooth tissue-supported partial denture when an occlusal load is applied, the denture tends to rock due to the difference in the compressibility of the abutment teeth and the soft tissues
- This can produce harmful effects on the abutment teeth In order to protect the abutment from such conditions, stress breakers are incorporated into a denture
Advantages of Stress Breaker :
- Stress Breaker preserves the alveolar support of the abutment
- Stress Breaker helps to create balanced stress on the residual ridge and the abutment
- Stress Breaker requires minimal direct retention
- This avoids the frequent need for relining and rebasing Weak teeth are well splinted
- Stress Breaker produces a massaging effect over soft tissues
Disadvantages of Stress Breaker:
- Stress Breaker is expensive
- Stress Breaker is difficult to repair
- Stress Breaker gets easily distorted
- Stress Breaker tends to food accumulation
- Stress Breaker reduces the stability of the denture It reduces indirect retention
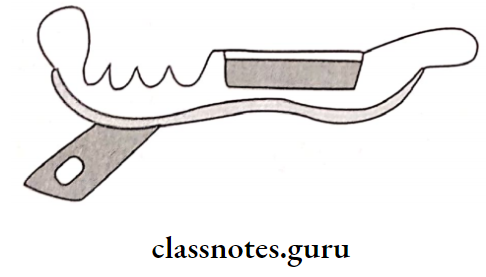
Types of Stress Breakers:
1. Stress Breakers Type 1:
- Here a movable joint is placed between the direct retainer and a denture base
- It decreases the amount of force acting on the abutment
- A Movable joint is placed between the direct retainer and denture base
- This joint may either be a Hinge or a ball and socket or a sleeve and cylinder
- Example: DALBO
2. Stress Breakers Type 2:
- Stress Breakers has flexible connections between the direct retainer and the denture base
- Stress Breakers can be a wrought wire connector divided or split major connector or a movable joint between two major connectors
Question 10. Classify direct retainers in the removable partial prosthesis. Explain about occlusal approaching clasps.
Answer:
Direct Retainer:
“A clasp or attachment applied to an abutment tooth for the purpose of holding a removable denture in position.”
Classification of Direct Retainer:
By Herman:
- Extracorporeal Direct Retainer: “A part of a removable partial denture which acts as a direct retainer for the denture by partially encircling or contacting an abutment tooth”
- Extracorporeal Direct Retainer includes:
- Suprabulge clasps
- Infrabulge clasps
- Extracorporeal Direct Retainer includes:
- Intracoronary Direct Retainer:
- In it, a part or the whole of the retentive components are located within the anatomic contour of the abutment teeth
- Precision attachment
- External attachment
- Stud attachment
- Bar attachment
- In it, a part or the whole of the retentive components are located within the anatomic contour of the abutment teeth
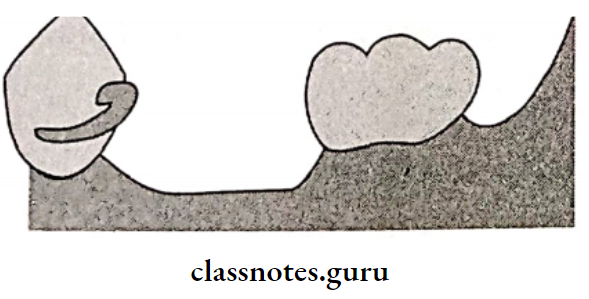
Occlusally Approaching Clasps:
- Circumferential Clasp/Aker’s clasp:
- These clasps embrace more than half of the abutment tooth
- Clasps prevents the rotation of the denture
- They approach the undercut from an occlusal direction
- Occlusally Approaching Clasps Advantages:
- Clasps is easy to fabricate and repair
- Clasps leads to less food retention
- Clasps can be best applied in a tooth-supported partial denture
- Provides excellent support and retention
- Occlusally Approaching Clasps Disadvantages:
- Clasps covers a large tooth surface area
- Alters buccolingual width of the crown
- Interferes with the normal food flow
- Leads to food accumulation and decalcification of the tooth structure
- Deprives periodontal stimulation
- It cannot be used for cases with an undercut away from edentulous space


Question 11. Give in detail the impression methods for providing adequate support in extension base removable partial denture.
Or
Physiologic impression in RPD
or
Functional relining methods
or
Fluid wax functional impression
or
Impression procedures for distal extension RPD
Answer:
- Dual impression techniques are used for extension base removable partial dentures.
- Such techniques record a part in the functional form and the remaining areas in the anatomical form
Dual Impressions Are Classified As:
- Physiological Or Functional Dual Impression:
- McLean’s technique
- Hindle’s modification
- Functional relining method
- Fluid wax method
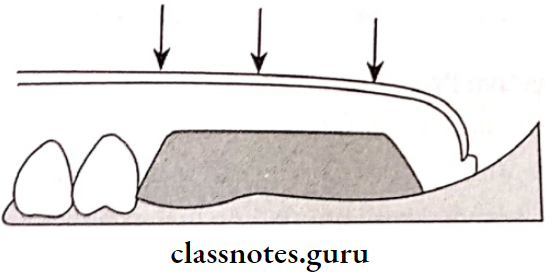
- Selective Pressure Technique:
- McLean’s technique
- A custom-made impression tray is fabricated over the edentulous areas of the primary cast
- Occlusal rims are made on the custom tray
- The tray is loaded with impression material
- It is inserted into the patient’s mouth
- Ask the patient to close on the rims
- Due to this, the tissues under the tray are compressed and the impression is recorded in this relation
- An alginate impression is made over the existing impression using a large stock tray
- Finger pressure is applied on the stock tray
- The impression is removed
- This leads the alginate over the impression to carry the functional impression along with it
- A cast is poured into the impression

- Hindle’s Modification:
- A special tray with stoppers and occlusal rims is fabricated using primary cast
- Hindle’s is loaded with impression material
- Hindle’s is inserted in the patient’s mouth
- A special stock tray with large holes loaded with alginate is used for over-impression
- The finger is placed into the holes to apply pressure on the occlusal rim
- Pressure is held till the alginate sets
- This pressure pushes the tray against the edentulous ridge
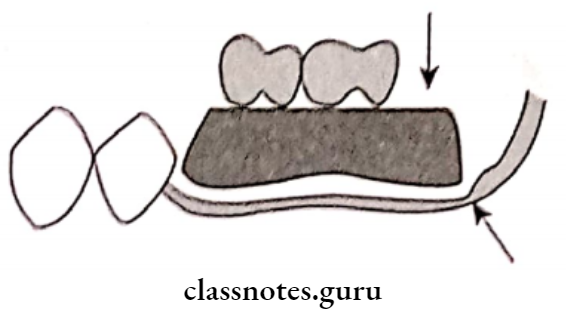
- Functional Relining Method:
- The single anatomic master impression is made
- The master cast is made from it
- It is then duplicated and a refractory cast is made • Soft metal spacer is adapted to the cast
- A framework is fabricated using a refractory cast and tried in the patient’s mouth
- Spacer is removed
- A functional impression is made on the tissue surface of a framework using low-fusing modeling plastic
- It is tempered and placed in the mouth
- Sufficient pressure is applied
- The modeling plastic at the borders of the framework is re-softened
- Border molding is carried out
- Modelling plastic is reduced by 1 mm
- The final impression is made with zinc oxide eugenol impression paste.
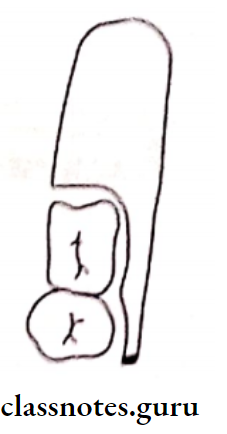
- Fluid Wax Functional Impression:
- The metal framework is fabricated using a refractory cast
- Fluid Wax is tried in the patient’s mouth
- The framework is positioned on the master cast
- The outline of the tray is drawn on the master cast
- The cast is coated with separating media
- A spacer is adapted over the crest of the edentulous ridge
- The framework is placed over the spacer
- Auto-polymerizing resin is adapted over the framework
- Excess Material Is Trimmed:
- Relief holes are made along the crest of the ridge
- Impression wax is softened and painted over the tissue surface of the framework
- It is seated in the patient’s mouth with half-open for at least 5 minutes
- The framework is removed and the impression is examined for glossy and dull areas
- Finally, place it for 12 minutes

- Selective Pressure Technique:
- The special tray is fabricated on the master cast
- The tissue surface of the tray is trimmed
- Selective Pressure is loaded with impression material
- Selective Pressure is inserted in the patient’s mouth
- Pressure is applied over the stress-bearing area.
Question 12. Discuss various components of removable partial dentures and the functional role of each.
Answer:
Components Of Removable Partial Denture:
1. Removable Partial Denture Major Connector:
- A removable Partial Denture is defined as “A part of a removable partial denture which connects the components on one side of the arch to the components on the opposite side of the arch”.
- Removable Partial Denture is the largest and most important component of the removable partial denture
- Removable Partial Denture forms the basic framework.
2. Removable Partial Denture Ideal Requirements:
- Removable Partial Denture should be rigid enough to uniformly distribute occlusal forces
- Removable Partial Denture should provide vertical support
- Removable Partial Denture should protect soft tissues
- Removable Partial Denture should provide indirect retention when needed It should be comfortable for the patient
- Removable Partial Denture should not allow food accumulation
- Removable Partial Denture should be self cleansable
3. Removable Partial Denture Classification:
- Maxillary:
- Single posterior palatal bar
- Palatal strap
- Palatal plate
- Antero posterior palatal bar
- Horseshoe connector
- Closed horseshoe
- Complete palate
- Mandibular:
- Lingual bar
- Lingual plate
- Kennedy bar
- Sublingual bar
- Cingulum bar
- Labial bar
4. Removable Partial Denture Location:
- Removable Partial Denture should be placed free of movable tissue
- Removable Partial Denture should avoid impingement of gingival tissue
- Bony and soft tissue prominence should be avoided
- Relief should be provided
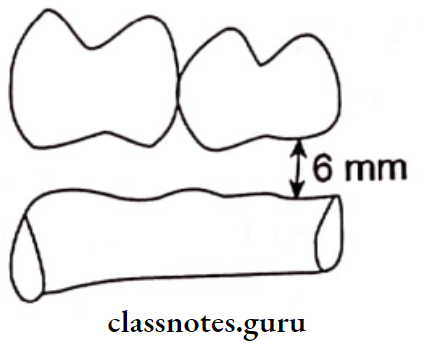
- The border of the major connector should be 6 mm away from gingival margins in the maxillary arch and 3 mm in the case of the mandibular arch
5. Removable Partial Denture Functions:
- Removable Partial Denture connects all the components of RPD
- Removable Partial Denture provide indirect retention
6. Removable Partial Denture Minor connector:
- Removable Partial Denture is defined as “The connecting link between the major connector or base of a removable partial denture and other units of the prosthesis, such as clasps, indirect retainers, and occlusal rests”.
7. Removable Partial Denture Types:
- The minor connector that connects the direct retainer to the major connector
- The minor connector that connects auxillary rests to the major connector
- The minor connector that connects the denture base to the major connector
- The minor connector that extends as the approach arm of a bar clasp.
Removable Partial Denture Form And Location:
- It should have sufficient bulk for rigidity
- Its thickest portion should lie on lingual surface
- It should taper in contact area to avoid sharp edges
- It should not rest in convex area rather present within embrasure
1. Functions:
- It connects the major connector to other parts
- It transmits stresses evenly to all components
- It transmits the force acting on the prosthesis to the edentulous ridge and the remaining natural teeth
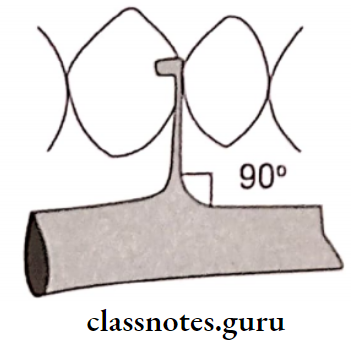
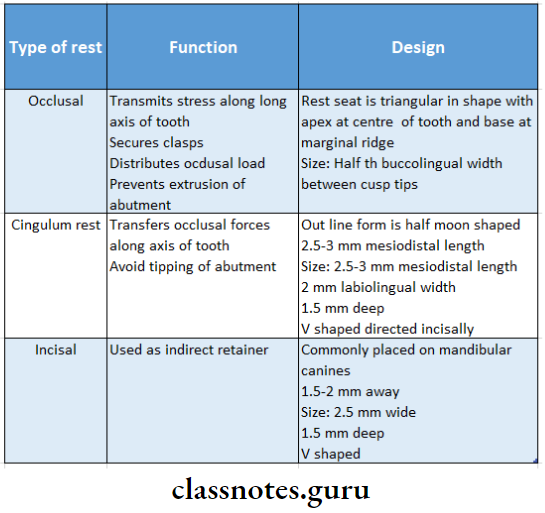
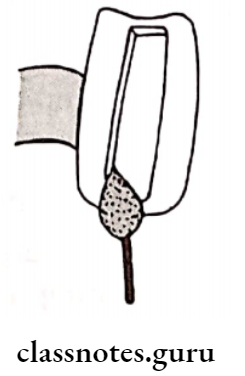
2. Rest:
- “It is defined as “A rigid extension of a fixed or re- movable partial denture which contacts a remaining tooth or teeth to dissipate vertical or horizontal forces.”
- Rests are metallic extensions in the denture frame. work that extend over the occlusal/lingual surface of the supporting teeth
Function Of Rest:
To transmit the occlusal forces acting on the denture along the long axis of the abutment teeth
Classification Of Rest:
- Based On The Relation Of The Rest To The Direct Retainer
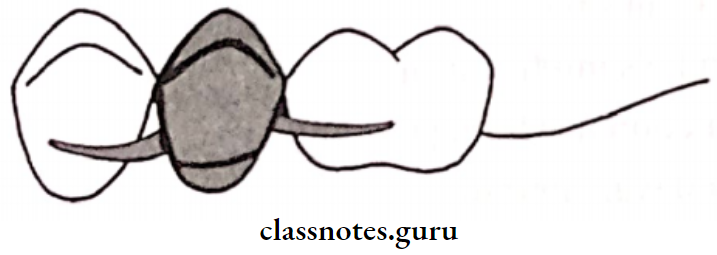
- Primary rRest – They are placed along with the clasp assembly
- Secondary/Auxillary rest – These are the one placed for indirect retention
- Based On The Location Of The Rest:
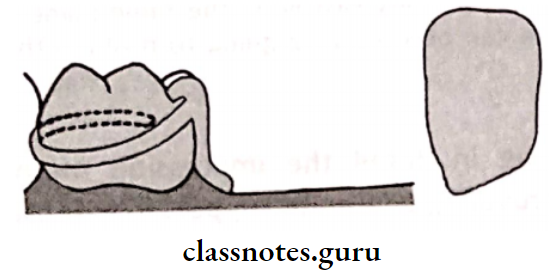
- Occlusal Rest
- Cingulum/ Lingual Rest
- Incisal Rest
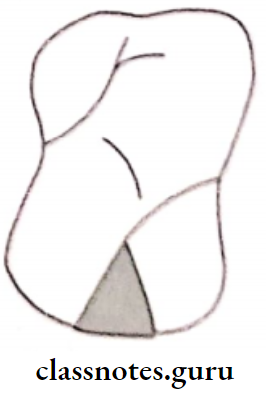
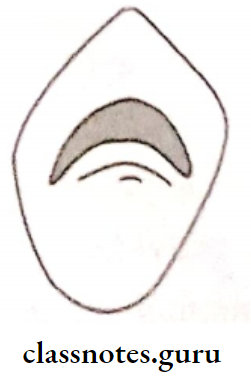
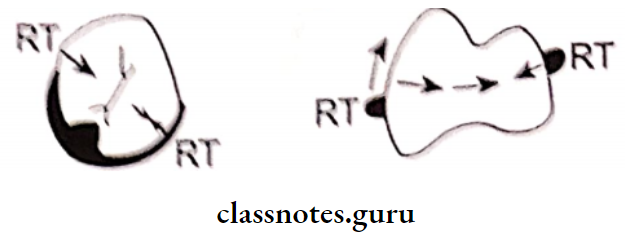
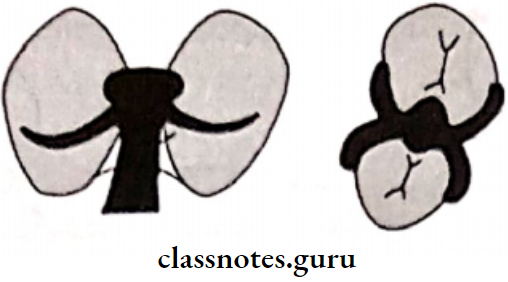
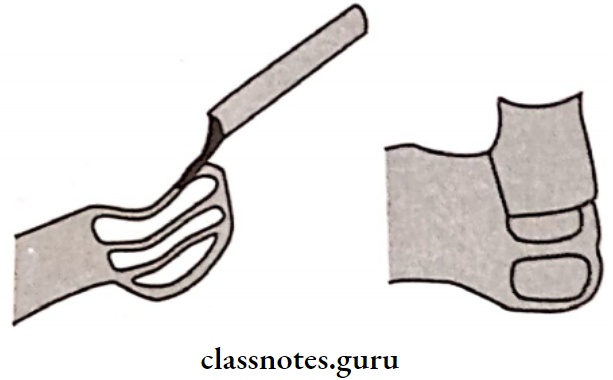
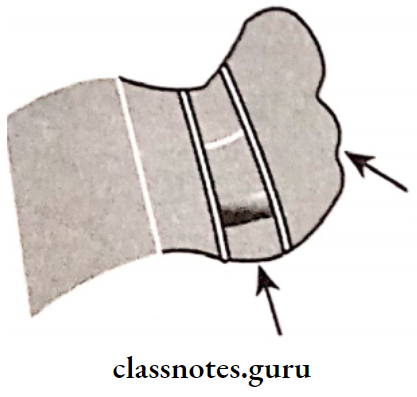
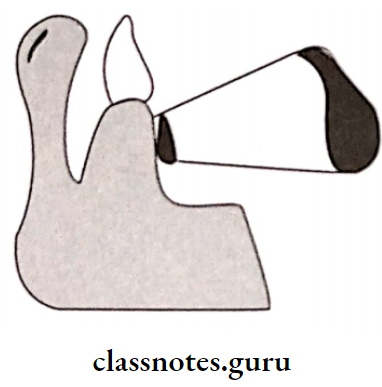
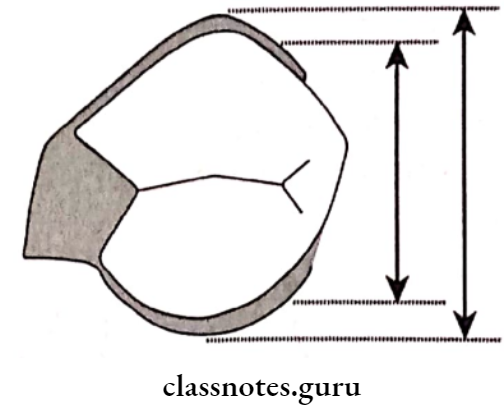
- Based On The Shape And Structure Of The Rest:
- Triangular
- Boomerang shaped
- Conservative circular
3. Direct Retainer:
- Direct Retainer is defined as “A clasp or attachment placed on an abutment tooth for the purpose of holding a removable denture in position”.
The Function Of Direct Retainer:
- Direct Retainer prevents the displacement of the denture
- Direct Retainer provides retention through the retentive arm of the clasp
- All components of the clasp except the retentive arm provide stability
- Direct Retainer resist the movement of the denture against the path of insertion
- Direct Retainer stabilizes the denture against horizontal movement
- The encirclement of the clasp confines it to the tooth during function
Classification of Direct Retainer:
- Intracoronary:
- Precision attachment
- Semiprecision attachment
- Extracoronal:
- Attachment
- Clasp assemblies
- Suprabulge
- Infrabulge
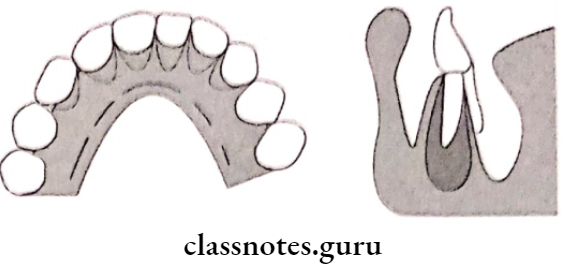
4. Indirect Retainers:
Indirect Retainer is defined as “a part of a removable partial denture which assists the direct retainers in preventing displacement of distal extension denture bases by functioning through lever action on the opposite side of the fulcrum”.’
Functions Of Indirect Retainers:
- Indirect Retainers counteract the lifting forces and stabilize the denture
- Indirect Retainers counteract horizontal forces and provide stability and support to the denture
- Indirect Retainers can splint and protect the anterior teeth
- Indirect Retainers may act as an auxiliary rest
- The dislodgement of the indirect retainer suggests the need of relining.
Types Of Indirect Retainers:
- Auxillary occlusal rest
- Canine extension
- Canine rest
- Continuous bar retainer Modification areas
- Rugae support
- Direct indirect retention
- Indirect retention from major connectors
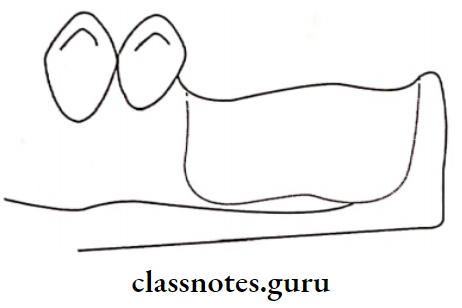
5. Denture Base:
Denture Base is defined as “that part of a complete or removable partial denture which rests upon the basal seat and to which teeth are attached”.
Requirements of Denture Base:
- Accurate tissue adaptation Thermal conductivity
- Sufficient strength
- Cleanability
- Cost-effective
Types of Denture Base:
- Acrylic
- Metal
- Combination
Functions Denture Base:
- Provide a framework for tooth adaptation
- Restores the contour of the edentulous ridge
6. Artificial Teeth attached to the denture base by the following methods
- Acrylic teeth fused with the denture base acrylic resin
Porcelain or acrylic tube teeth are usually cemented to the metal base
Resin teeth processed directly over the metal base - Metal teeth are cast along with the framework
- Chemical bonding of acrylic with the metal base
Question 13. Enumerate various components of RPD and discuss in detail about the maxillary major connector.
Answer:
Components Of RPD:
- Major connector
- Minor connector
- Direct retainer
- Indirect retainer
- Rest
- Denture base
- Artificial tooth
Maxillary Major Connector Requirements:
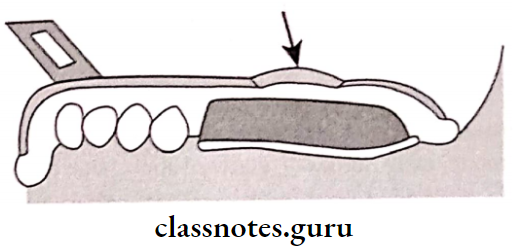
Beading should be given to the posterior margin of the maxillary major connector to provide a seal with the soft tissue in their margin
- It should be rigid enough to distribute occlusal forces
- The border of the connector should be 6 mm away from the gingival margins
- The borders should be parallel to the gingival margins
- The borders should be rounded to avoid interference to the tongue
- The Anterior border should end in the valley of the rugae and not on the crest
Maxillary Major Connector Types Features and Indications:
- Type 1: Single Posterior palatal bar
- Single Posterior Palatal Bar Feature And Indication: It is a bar running across the palate
- Single Posterior Palatal Bar Used In:
- Interim partial denture
- Single Posterior Palatal Bar Used In:
- Type 2: Palatal strap
- Palatal Strap Feature And Indication: A thin Band of Metal plate runs across the palate
- Palatal Strap Used in:
- Unilateral distal extension partial denture
- Palatal Strap Used in:
- Type 3: Palatal plate
- Palatal Plate Feature And Indication: Broader than the palatal strap
- Palatal Plate Used in:
- Class 1
- ‘V’ Or ‘U’ shaped palate
- Strong abutment
- More than six remaining anterior teeth
- Palatal Plate Used in:
- Type 4: Anterior Posterior bar
- Anterior Posterior Bar Feature And Indication: It is a combination of an anterior palatal strap and a posterior palatal bar
- Anterior Posterior Bar Used in:
- When anterior and posterior abutments are widely separated
- Large inoperable tori
- Anterior Posterior Bar Used in:
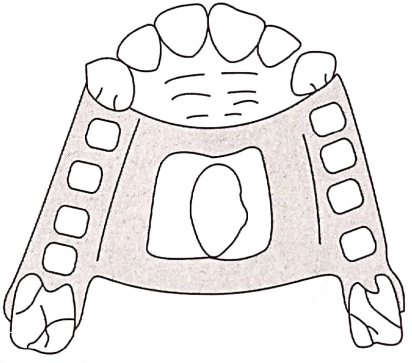
Anterior Posterior bar Design Procedure:
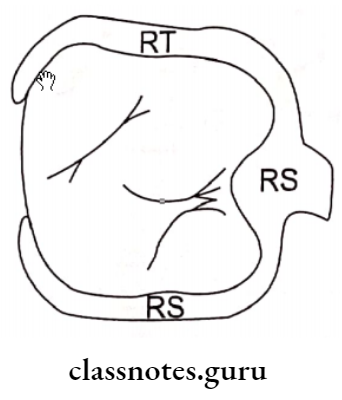
- Step 1-Outline the stress-bearing area
- Step 2- Outline the non-stress-bearing area
- Step 3 – Outline the extend of the connector
- Step 4- Select the connector based on
- Patient’s comfort
- Rigidity required
- Denture base
- Amount of indirect retention required
Step 5-Connect All The Markings:

Question 14. Add a note on various types of clasp.
Answer:
Types Of Clasp:
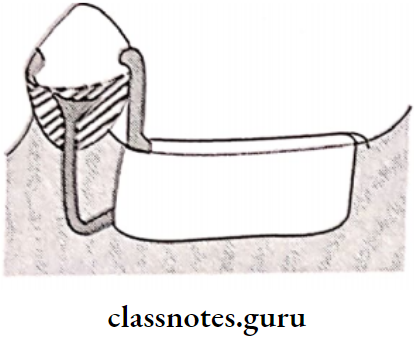
1. Circumferential Clasp/Aker’s Clasp:
- These clasps embrace more than half of the abutment tooth
- Circumferential Clasp prevents the rotation of the denture
- They approach the undercut from an occlusal direction
Circumferential Clasp Advantages:
- Circumferential Clasp is easy to fabricate and repair
- Circumferential Clasp leads to less food retention
- Circumferential Clasp can be best applied in a tooth-supported partial denture
- Provides excellent support and retention
Circumferential Clasp Disadvantages:
- Circumferential Clasp covers a large tooth surface area
- Alters buccolingual width of the crown Interferes with the normal food flow
- This leads to food accumulation and decalcification of the tooth structure Deprives periodontal stimulation
- Circumferential Clasp cannot be used for cases with an undercut away from edentulous space
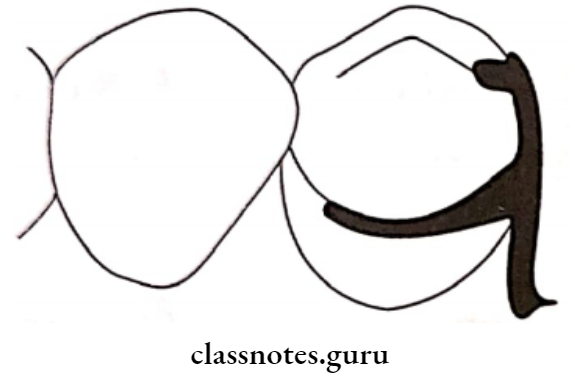
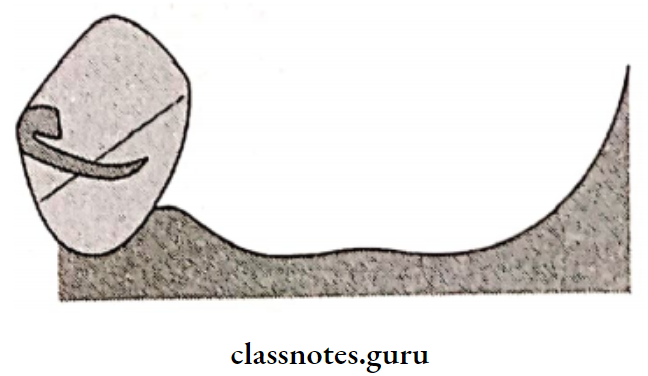
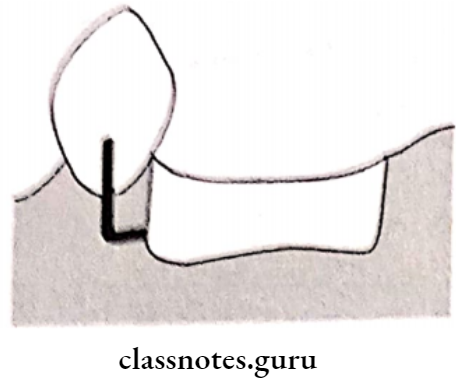
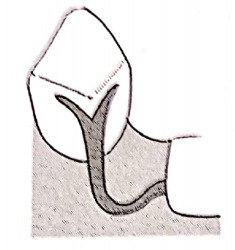
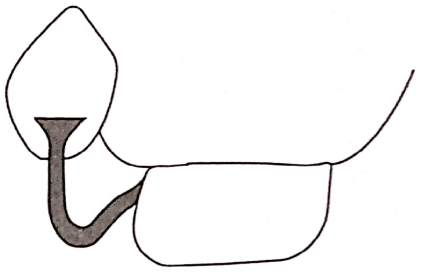
2. Bar Clasp:
- Bar Clasp is an infra bulge clasp
- Bar Clasp approaches the undercut gingivally
- Bar Clasp has a push type of retention
Bar Clasp Parts:
- Retentive arm
- Gingival approach arm
- Retentive terminal
- Rest
- Shoulder
- Body
- Proximal plate
- Reciprocal arm
Bar Clasp Advantages:
- Bar Clasp Is easy to Insert
- It is more esthetic
Bar Clasp Disadvantages:
- Bar Clasp tends to collect food debris
- Bar Clasp has reduced bracing and stabilization
- Bar Clasp needs additional stabilizing units
Types Of Claps:
- T clasp
- Modified T clasp
- Y clasp
- I clasp
- Mirror view clasp
- I bar
Question 15. Discuss diagnosis and treatment planning for Kennedy’s Class 1 patient.
Answer:
Diagnosis:
1. Clinical Diagnosis:
- Periodontal Health:
- The periodontal condition of the existing teeth should be examined
- Clinical signs of periodontal health should be evaluated
- Oral hygiene is evaluated
- Mobility of teeth, if present is measured
- Occlusion of Existing teeth:
- The teeth should have a good cusp-to-fossa relationship
- Evaluate the alignment of teeth
- Trauma from occlusion is evaluated
- Conservative And Endodontic Status
- The existing teeth should be examined to rule out the presence of carious lesions, vitality of the pulp
- The teeth should be examined for cracks, chipped corners, and fractures
- Radiological Examination
- The bone loss should be evaluated
- The structure of the basal bone in the denture-bearing area should be evaluated
- Presence of periapical bone loss and furcation involvement should be examined
- The presence of impacted teeth and submerged root stumps should be examined
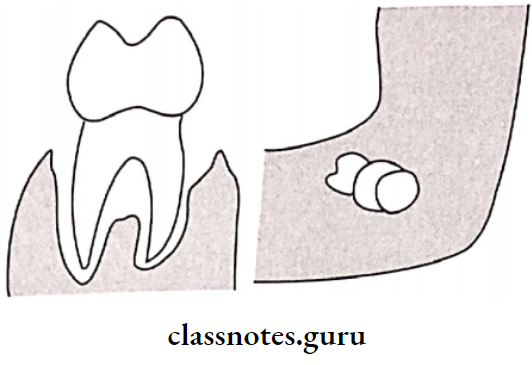
2. Derived Diagnosis:
Derived Diagnosis is obtained from a diagnostic cast that is obtained from a diagnostic impression.
Derived Diagnosis Preparation:
- A stock tray of a suitable size should be selected Alginate is mixed in motion and loaded into the tray ray is inserted in the patient’s mouth
- After the material gets set, it is removed by a single-stroke
- Inspect for any void
- Disinfect the impression
- Pour the cast within 12 minutes
- Trimming of the cast is carried out
- Survey the cast
Derived Diagnosis Purpose:
- To locate the favorable and unfavorable undercuts
- To determine the need for pre-prosthetic mouth preparation
- To determine the path of insertion of the denture
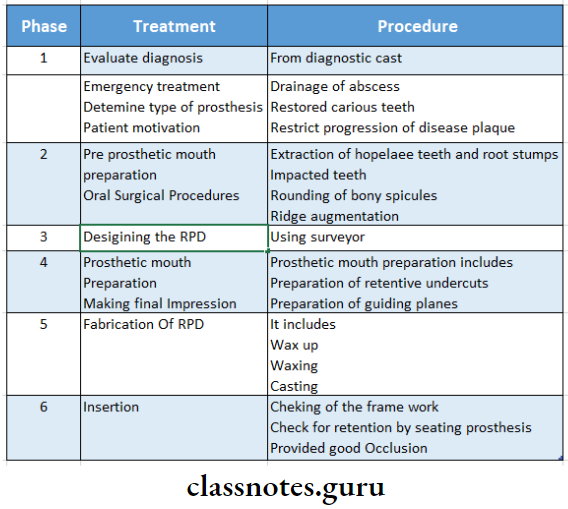
Derived Diagnosis Treatment Planning:
- Treatment should be properly planned before starting the treatment
- It can be divided into six different stages
Question 16. Types of mandibular major connectors.
Answer:
Mandibular Major connector:
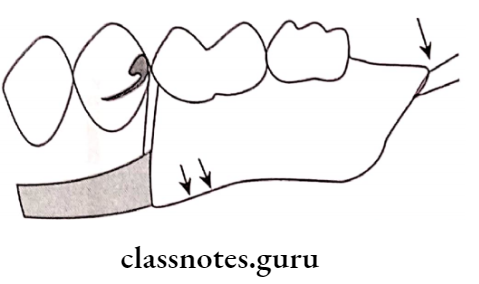
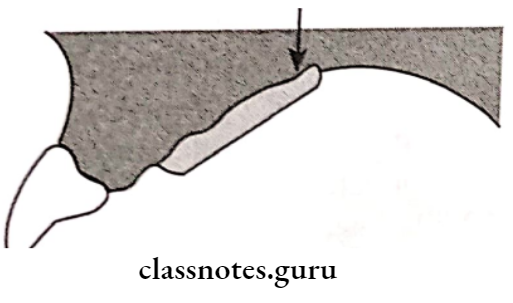
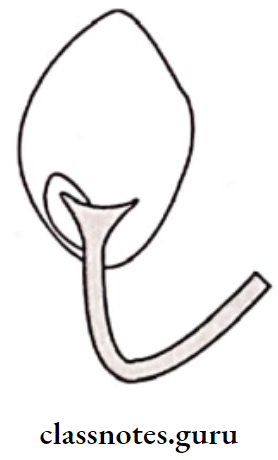
1. Lingual Bar Design:
- It is half pear-shaped
- Its thickest portion is placed inferiorly
- There must be 8 mm vertical clearance from the floor of the mouth
The upper border should have 3 mm clearance from the marginal gingiva - The minimum height should be 5 mm
- It should be as inferior as possible
Lingual Bar Design Advantages:
- Lingual Bar Design is easy to fabricate
- Lingual Bar Design has mild soft tissue contact
Lingual Bar Design Disadvantages:
- Contraindicated in the presence of Tori
- Contraindicated in short vestibule
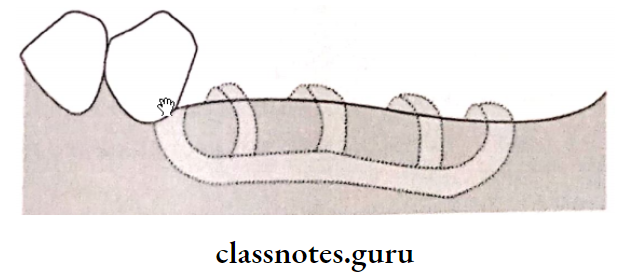
2. Lingual Plate Design:
- The superior border extends up to the cingulum It is scalloped in between the teeth
- In the presence of large embrasures, it is made to dip down-step back design
- Anteriorly, it should be supported by rests
Lingual Plate Design Indications:
- In the absence of posterior teeth
- In the presence of periodontally weakened teeth
- In the case of a short vestibule
- In the case of resorbed ridge
- In bilateral distal extension conditions
- When additional teeth are to be added
- In the case of retrognathic jaw
Lingual Plate Design Advantages:
- Rigid, stable
- Provide indirect retention
- Provide the addition of teeth
Lingual Plate Design Disadvantages:
- Food accumulation Decalcification of teeth
- Soft tissue irritation
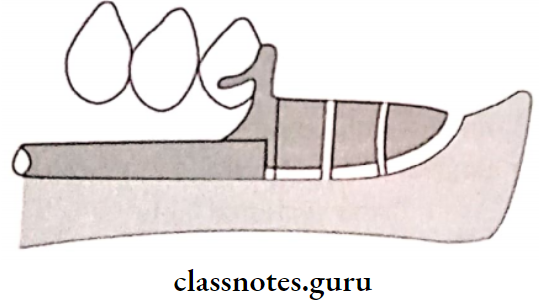
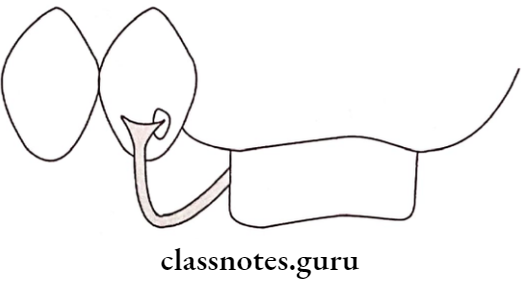
3. Double Lingual/Kennedy Bar Design:
- The middle portion is cut off
- The lower part is pear-shaped
- The upper part is half oval 2-3 mm high and 1 mm thick
- The upper bar should dip into the embrasure
- Two bars are connected by a minor connector
Double Lingual/Kennedy Bar Design Indications:
- Large embrasures cases
- Large diastema cases
Double Lingual/Kennedy Bar Design Advantages:
- Provide indirect retention
- Horizontal stabilization
- Allow free flow of saliva
Double Lingual/Kennedy Bar Design Disadvantages:
- Tongue interference
- Food entrapment
4. Sublingual Bar:
- Similar to the lingual bar
- It is placed more inferiorly and posteriorly
Sublingual Bar Indications:
- Short vestibular depth
- Along with the linguistic plate
- Presence of anterior lingual undercut
Sublingual Bar Contraindications:
- Lingual tori
- High frenal attachments
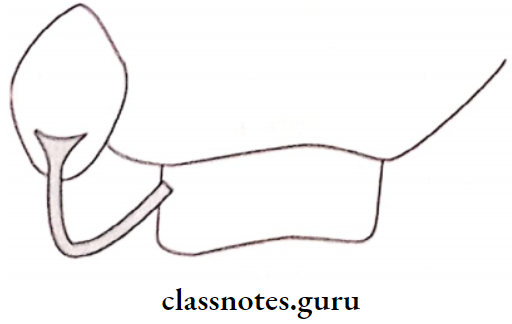
5. Cingulum Bar:
- The Cingulum Bar is located on or slightly above the cingula of the anterior teeth
Cingulum Bar Indications:
- Large embrasures cases
- Large diastema cases
6. Labial Bar:
- Placed on the labial surface
- Labial Bar is similar to the lingual bar, but broader and thicker
Labial Bar Indications:
- Lingually inclined teeth
- Presence of tori
Labial Bar Disadvantages:
- Poor esthetics
- Distort the lower lip
- Patient discomfort
Question 17. Classify clasps. Give the difference between gingivally and occlusally approaching clasps.
Answer:
1. Circumferential/Aker’s clasp/Occlusally Approaching:
“A clasp that encircles a tooth by more than 180°, including opposite angles, and which usually has total contact with the tooth with at least one terminal being in the infra bulge area”.
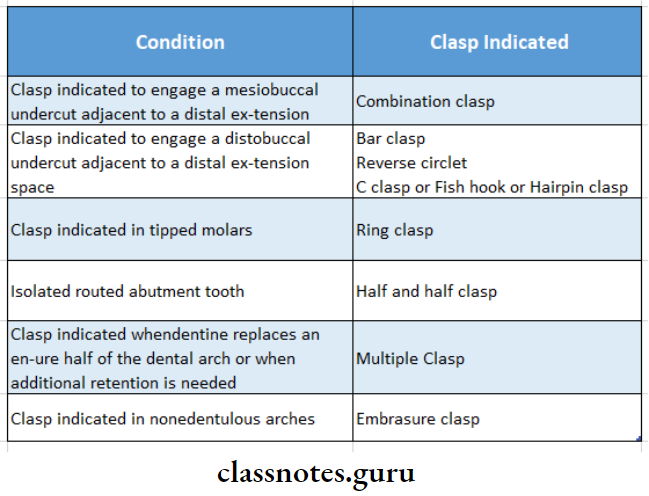
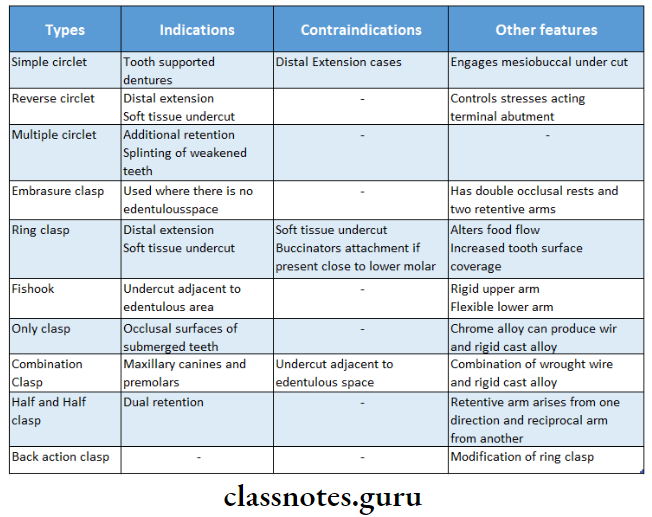
Sub-Types:
- Simple circlet clasp
- Reverse clasp
- Multiple circle clasp
- Embrasure clasp
- Ring clasp
- Fishhook or hairpin clasp
- Onlay clasp
- Combination clasp
- Back action
- Half and Half clasp
- Grasso’s clasp
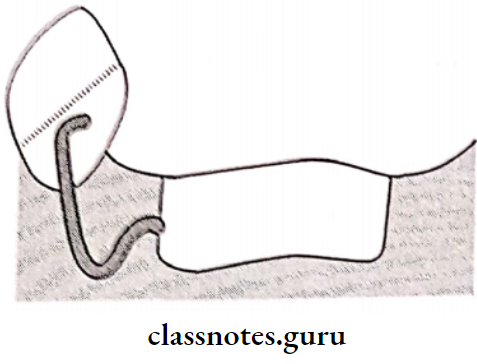
2. Vertical Projection/Bar/Roach Clasp:
“A clasp having arms which are bar-type extensions from major connectors or from within the denture base, the arms pass adjacent to the soft tissues and approach the point or area of contact on the tooth in a gingival-occlusal direction”
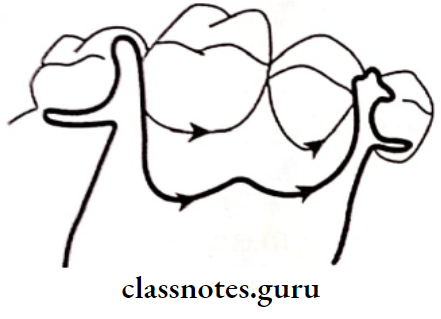
3. Continuous Clasp:
“A metal bar usually resting on the lingual surface of teeth to aid in their stabilization and to act as an indirect retainer”.
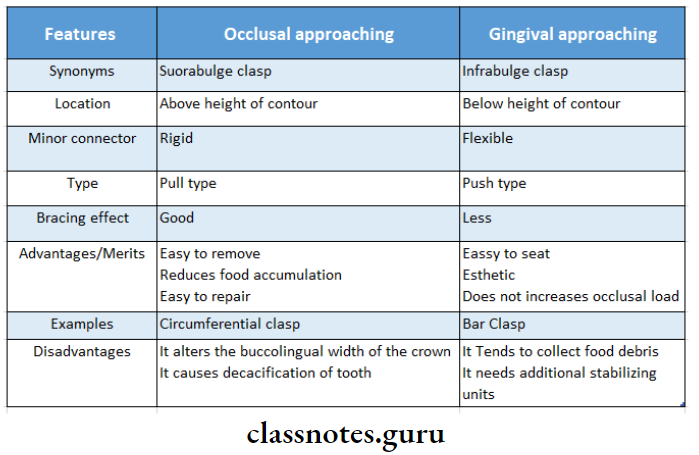
Difference Between Occlusal Approaching And Gingival Approaching Clasp: