Intraoral Radiographic Techniques Short Essays
Question 1. Paralleling technique/Long cone technique.
Answer.
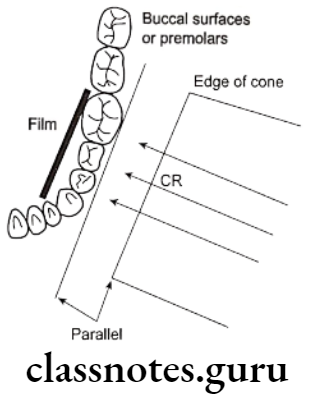
Paralleling technique
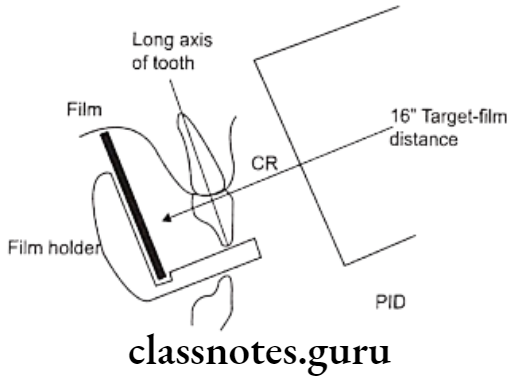
- In this technique the X-ray film is placed parallel to the long axis of the tooth and the central ray of the X-ray beam is directed at right angles to the tooth and film
- The film must be placed away from the tooth and towards the middle of the oral cavity
- The object film distance must be increased
- It is also referred to as the long-cone technique
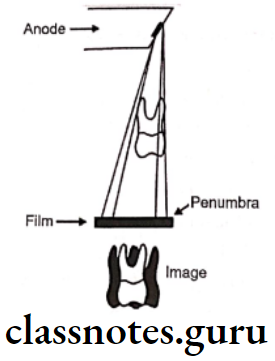
Long Cone Technique Target Film Distance:
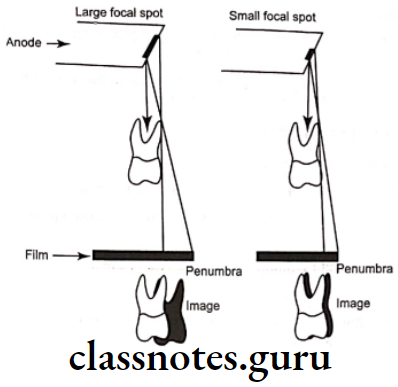
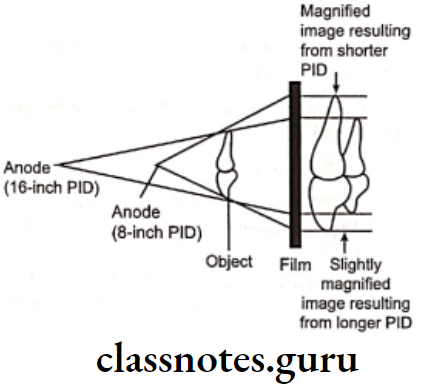
- The target film distance is large
- This results in less image magnification and better definition
Long Cone Technique Film Holders:
- This technique requires filmholders
Long Cone Technique Film:
- Ideally, the size of the film used will depend upon the teeth being radiographed
- Size 1: used for interiors
- Size 2: used for posteriors
Long Cone Technique Film Placement:
- The white side of the film always faces the teeth
- For interiors, the film is placed vertically
- For posteriors, the film is placed horizontally
- The identification dot on the film is always placed toward the occlusal surface
- Always place the film away from the teeth and towards the middle of the oral cavity
- The film must be positioned to cover the prescribed area of the teeth to be examined
Read And Learn More: Oral Radiology Question and Answers
Long Cone Technique Patient Position:
- Explain the procedure to the patient
- Position the patient comfortably on the chair
- Adjust the patient’s head such that the occlusal place of the upper arch is parallel to the floor
- Mid sagittal plane is perpendicular to the floor
- Secure lead apron and thyroid collar
- Remove all objects from the mouth that may interfere with the film exposure
Long Cone Technique Basic Rules:
- Film placement film must cover the prescribed area of the teeth to be examined
- Film position the film must be placed parallel to the long axis of the tooth
- The holder is rotated so that the teeth to be examined are touching the block
- The correct focal spot to film distance is determined
- In vertical angulation, the central ray of the X-ray beam is directed perpendicular to the film, and the long axis of the tooth
- In horizontal angulation, the central ray of the X-ray beam is directed through the contact areas of the film are exposed
- Film exposure the X-ray beam must be centered on the film to ensure that all areas of the film are exposed
- Exposure is made
Long Cone Technique Advantages:
- This technique produces an image that has dimensional accuracy
- It is simple and easy to learn and use
- It is easy to standardize and can be accurately duplicated or repeated
- Facial screens can be used
- There is decreased secondary radiation
- The shadow of the Zygomatic bone appears above the apices of the molar teeth
- The periodontal levels are well represented
- There is minimal foreshortening or elongation
- Good detection of interproximal caries
- Useful in handicapped and compromised patients as the relative position of the film packet, teeth, and X-ray beam are always maintained
Long Cone Technique Disadvantages:
- The film-holding device is difficult to place in children and patients with shallow palate
- The film-holding device causes discomfort to the patient
- Object film distance is increased
- There is an increase in the exposure time
- It is more space-consuming
- Sometimes the apices of the teeth are very close to the edge of the film and so not well appreciated
- The holders need to be autoclaved
Question 2. Principles of projection geometry.
Answer.
Principles of projection geometry
- The basic principles of projection geometry are as follows:
- The focal spot should be as small as possible
- The focal spot object distance should be as long as possible
- The object film distance should be as small as possible
- The long axis of the object and the film planes should be paralleling
- The X-ray beam should strike the object and the film planes at tight angles
- There should be no movement of the tube, film, or patient during exposure
Question 3. Bitewing radiograph
Answer.
Bitewing radiograph
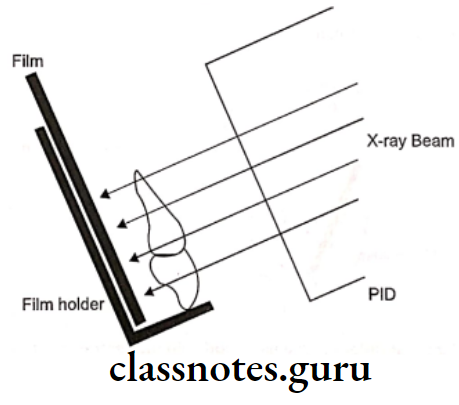
- It is also called Short Cone Technique
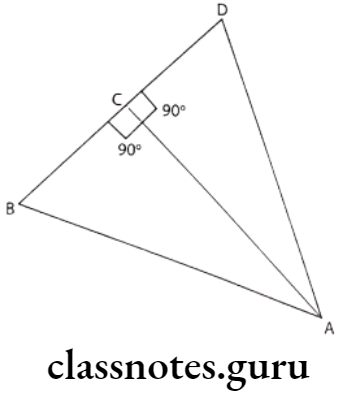
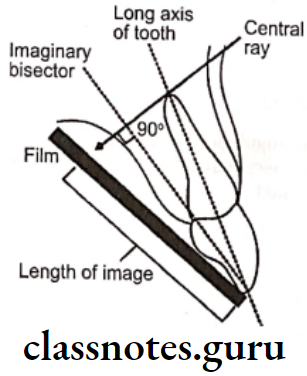
- It is based on the principle known as “Ciesenzky’s rule of isometry”
- It states that the two triangles at equal if they have two equal angles and share a common side
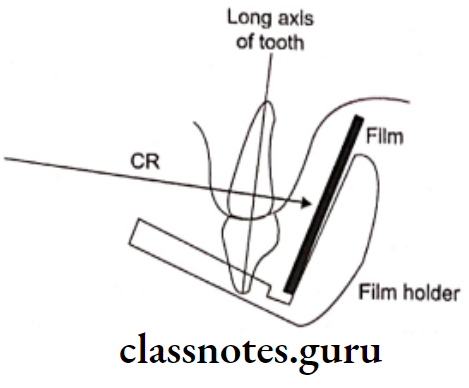
- The X-ray beam should bisect the imaginary bisector that bisects the angle formed by the film and the long axis of the tooth
- When the rule is strictly followed, the resultant image obtained is accurate
Bitewing Radiograph Guidelines:
- The white side of the film always faces the teeth
- Anterior films are always placed vertically
- Posterior films are always placed horizontally
- The incisal or occlusal edge of the film must extend approximately 1/8th inch beyond the incisal or occlusal surface of the tooth
- Always center the film over the area to be examined
- If the patient’s finger is used for stabilization, instruct the patient to gently push the film against the lingual/palatal surface of the tooth
Bitewing Radiograph Basic Rules:
- Film placement film must cover the prescribed area of the teeth to be examined
- Film position the film must be placed parallel to the long axis of the tooth
- In vertical angulation, the central ray of the X-ray beam is directed perpendicular to the film and the long axis of the tooth
- In horizontal angulation, the central ray of the X-ray beam is directed through the contact areas of the film are exposed
- Film exposure the X-ray beam must be centered on the film to ensure that all areas of the film are exposed
Bitewing Radiograph Advantages:
- It can be used in patients with shallow palate, bony growth
- It is quick and comfortable
- Decreased exposure time required
- Short PID is used
- If angulations are correct, the image obtained is of the same size
- No sterilization of holders is required as they are not used
Bitewing Radiograph Disadvantages:
- Image distortion may occur due to the use of short PID
- By using a film holder it becomes difficult to visualize the imaginary bisector
- Incorrect horizontal angulation results in overlapping
- Incorrect vertical angulation leads to elongation or foreshortening
- If the patient’s finger is used for stabilization, the patient may shift the film before or during exposure
- The patient’s hand is exposed unnecessarily
- The periodontal tissues are poorly represented
- Overlapping of shadows of Zygomatic bone occurs
- The Buccal roots of premolars and molars are foreshortened
- The crowns of the teeth are often distorted.